Step-by-Step Guide to Transfer Videos from iPad to PC

Feb 26, 2025 • Filed to: Manage Device Data • Proven solutions
Ever found yourself wanting to relive those special moments captured on your iPad? The iPad's storage might be reliable, but with time, it can feel a bit cramped. That's where learning to transfer videos from iPad to PC comes in handy – not just for freeing up space but also for a better viewing experience on your computer.
In this easy-to-follow guide, we'll take you through several methods to transfer videos from iPad to computer. Declutter your iPad and enjoy your favorite videos on a larger screen.
- Part 1. Can I Transfer Videos From iPad to PC With iTunes?
- Part 2. How To Move Videos From iPad to Computer With Reliable Software

- Part 3. How To Get a Video From iPad to Computer Online via iCloud
- Part 4. How To Send a Video From iPad to Computer Through Email
- Which Method Should I Use To Transfer Videos From iPad to PC?
Part 1. Can I Transfer Videos From iPad to PC With iTunes?
iTunes functions as a centralized hub for managing various Apple devices and Mac computers. However, you can only use iTunes to transfer only purchased items, such as videos and music, rather than individual files from the iPad to the PC.
While the application has its limitations, it is deemed secure and notably recommended by Apple. To transfer a video from iPad to PC using iTunes, follow the steps below:
Step 1: Access the iPad on iTunes
Connect your iPad and launch iTunes on your computer. Navigate to the iPad window by clicking on the Devices icon in the upper-right section of the navigation bar.
Step 2: Transfer the videos.
In the menu bar at the top, click on "File," go to "Devices," and select "Transfer Purchases from iPad" from the submenu. This action will transfer all your purchased items from the iPad to the computer.

Part 2. How To Move Videos From iPad to Computer With Reliable Software
iTunes limitations may leave you seeking alternative solutions. If you prefer a more flexible method that allows you to handpick specific videos for transfer, consider using reliable third-party software such as Wondershare Dr.Fone.
Dr.Fone offers a user-friendly interface and a broader range of features to enhance your video transfer experience. Through its Phone Manager feature, you can simplify the process of managing and transferring files between iOS devices and computers.
Dr.Fone - Phone Manager (iOS)
Transfer Videos From iPad to PC
- Transfer, manage, export/import your music, photos, videos, contacts, SMS, Apps, etc.
- Back up your music, photos, videos, contacts, SMS, Apps, etc., to the computer and restore them easily.
- Transfer music, photos, videos, contacts, messages, etc., from one smartphone to another.
- Transfer media files between iOS devices and iTunes.
- Fully compatible with the newest iOS system.


How to transfer videos from iPad to PC with Dr.Fone:
Step 1: Launch Dr.Fone and establish a connection
Initiate Dr.Fone on your computer and Image name your iPad. Grant any necessary authorizations prompted during the connection process.

Step 2: Access Video Files in Dr.Fone
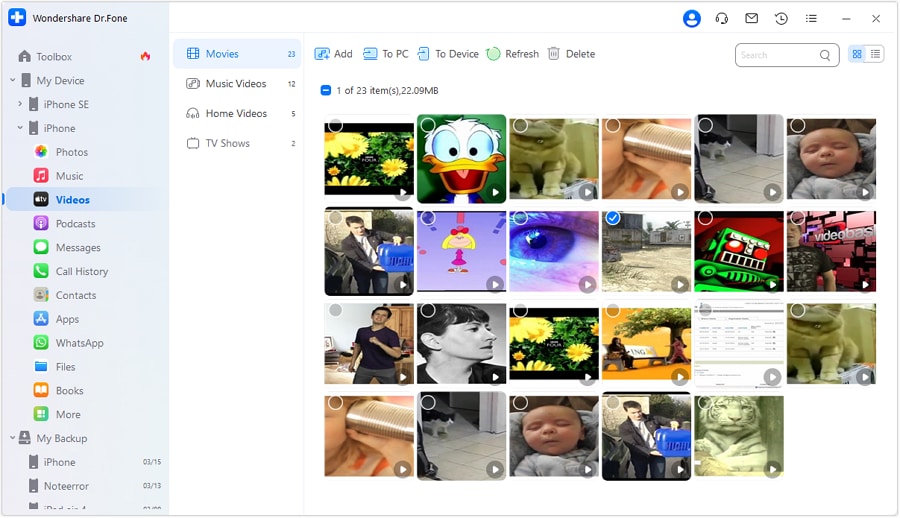
Upon connecting your iOS device, locate the "Videos" tab in the left-hand panel under your device. This will direct you to a specific screen presenting various video categories such as Movies, Music Videos, Home Videos, and TV Shows.

Step 3: Customize the video display
Tailor the display of your videos by utilizing the Album View and List View options, conveniently situated on the top-right side of the screen.
To manage additional videos on your iPhone, click the Add button for importing the files.
Step 4: Select and Initiate Transfer
Select the videos to transfer and click "To PC" in the top menu. Locate the file destination for your videos and complete the transfer.
Part 3. How To Get a Video From iPad to Computer Online via iCloud
For those who prefer bulk uploads and an online approach to transfer videos from iPad to computer, iCloud can be a solution.
iCloud is Apple’s cloud-based service enabling users to store and synchronize their data securely across devices. This method eliminates the need for cables and lets you access your videos from any device connected to your iCloud account.
Follow these instructions on how to get video from iPad to PC with iCloud.
Step 1: Enable iCloud on your iPad
Make sure that you have activated iCloud on your iPad. Go to iPad "Settings," tap your name, select "iCloud," and switch on the "Photos" option.

Step 2: Upload videos to iCloud
Go to the "Photos" app on your iPad. Then, select the videos and tap on "Share." Choose "Save to Files" and select iCloud Drive as the destination.
Step 3: Access iCloud on your computer
Go to the iCloud website (icloud.com) on your computer. Log in with your Apple ID.
Step 4: Download videos to your computer
Find and select the videos you uploaded from your iPad on iCloud, and click download to save them to your computer.
Part 4. How To Send a Video From iPad to Computer Through Email
If you prefer a straightforward and familiar method, sending videos to your computer via email provides a quick and user-friendly solution. This method is particularly convenient for those who are accustomed to email communication and seek a hassle-free way to transfer videos between devices.
However, it’s important to remember that email imposes a size limit for sending videos, typically up to 25MB. Beyond this limit, it is advisable to upload the videos to your Google Drive.
Here’s how to send video from iPad to PC via email:
Step 1: Open the Email app on your iPad
Launch the email application on your iPad. It could be Apple Mail, Gmail, Yahoo Mail, or any other email client you use.
Step 2: Compose a new Email
Tap on the "Compose" or "New Email" option to start a new email.
Step 3: Attach the video file
Look for an attachment icon within the email composition screen (usually represented by a paperclip). Select this icon to attach files, then choose the video or videos you want to send.

Step 4: Enter your email address and send the email.
Enter your own email address in the recipient field. Then, click on the "Send" button to dispatch the email containing the attached video files.
Step 5: Access your email and download the video.
Switch to your computer and open the email application, or log in to your account through a web browser. Then, find the email you sent to yourself, open it, and download the attached video files to your computer.
Which Method Should I Use To Transfer Videos From iPad to PC?
Choosing the right method to transfer videos from your iPad to your PC depends on your preferences, the size of the videos, and your comfort level with each process. You can also consider factors such as file size, internet connectivity, and the need for selective transfers to determine the most suitable method for you.
Method 1-iTunes
|
Pros |
Cons |
| Standard and widely used, with a familiar interface. | Limited to purchased items, not allowing selective video transfers. |
| Requires a USB cable for connection. |
Method 2-Wondershare Dr.Fone
|
Pros |
Cons |
| Selective transfer of individual videos for greater control. | Requires additional software installation |
| No quality loss. | |
| Wide compatibility with various devices. | |
| User-friendly interface, suitable for users with limited technical expertise. |
Method 3-iCloud
|
Pros |
Cons |
| Wireless transfer. | Limited free storage. |
| Access videos from any device connected to your iCloud account. | Larger video files may require additional space. |
| Dependence on a stable internet connection. |
Method 4-Email
|
Pros |
Cons |
| Familiar and simple method. | Limited by email attachment file size limits to 25 MB. |
| Accessible from any device. | May clutter your email inbox if used frequently for large video transfers.. |
| Requires stable internet. |
FAQs
Conclusion
We've covered various methods on how to transfer a video from iPad to computer. Each method offers unique advantages to cater to different preferences and situations. From iTunes, iCloud, and email to reliable third-party software like Wondershare Dr.Fone – you now have a comprehensive toolkit to choose from.
Consider factors like file size, internet connectivity, and your comfort level with different tools when selecting the method that best fits your needs.


iPad Tips & Tricks


Alice MJ
staff Editor