How to Transfer Purchased Items from iPad to iTunes

Jan 11, 2024 • Filed to: Manage Device Data • Proven solutions
iTunes store is a good resource for downloading and purchasing items, such as music, podcast, audiobook, video, iTunes U and more, which brings much pleasure and convenience to your daily life. Since the purchased items are protected by the Apple FailPlay DRM protection, you're only allowed to share the items among your iPhone, iPad and iPod. Thus, to keep the purchased items safe, you probably want to transfer them to iTunes library.
This post will introduce how to transfer purchased items from iPad to iTunes library with iTunes, and also offers the methods to transfer all files, purchased and non-purchased, from iPad to iTunes library without iTunes. Check it out.
Part 1. Transfer Purchased Items to iTunes library
It is easy to transfer purchased items from iPad to iTunes with just a couple of clicks. Before you start with the instruction, please ensure you have downloaded and installed the latest version of iTunes (get it at the official Apple website) and have the lightening USB cable for iPad.
Step 1. Authorize the computer
If you have authorized the computer, please skip this step to step 2. If not, follow this step.
Launch iTunes on your computer, and choose Account > Authorization > Authorize This Computer.This brings a dialog box. Enter your Apple ID and password that you use to purchase items. If the items you purchased with multiple Apple IDs, you need to authorize the computer for each one.
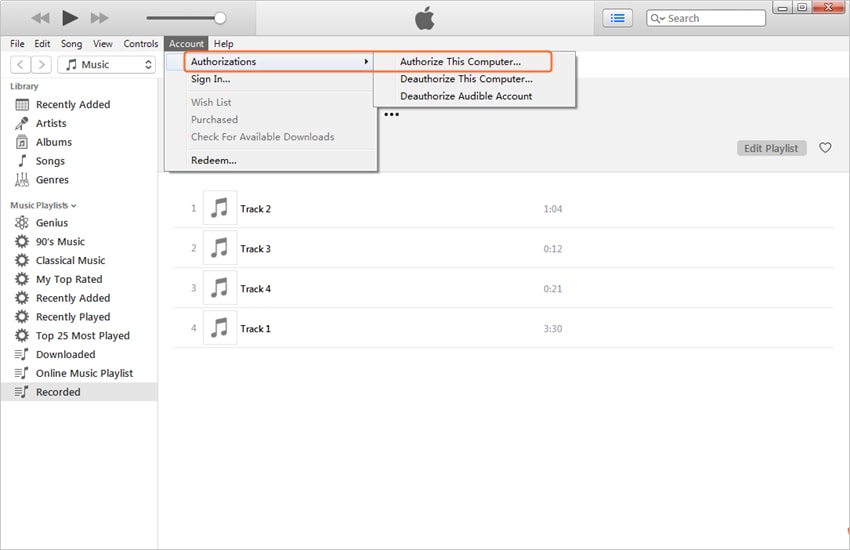
Note: You can authorize up to 5 computers with one Apple ID.
Step 2. Connect Your iPad to the Computer
Connect your iPad with PC via an original USB cord in order to avoid any potential issues during the process. iTunes will recognize it automatically and you will notice your iPad listed if you click on the phone icon at the upper part of the screen.

Step 3. Copy iPad purchased items to iTunes library
Choose File from the top Menu and then hover over Devices to list available devices at the moment. In this case, you will have an optiop of Transfer Purchases from "iPad".

The process of how to transfer purchases from iPad to iTunes will be finished in a couple of minutes, depending on how many items you have to move.
Part 2. Transfer iPad Non-Purchased Files to iTunes Library
When it comes to export the non-purchased items from iPad to iTunes library, iTunes turns out to be helpless. In this case, you're highly recommended to rely on the third-party software - Dr.Fone - Phone Manager (iOS). This software makes it extremely easy to transfer the non-purchased and purchased music, movies, podcasts, iTunes U, audiobook and others back to iTunes library.
Now I would like to show you how to transfer items from iPad to iTunes library with the Windows version. Click the button to download the software.
Dr.Fone - Phone Manager (iOS)
Transfer MP3 to iPhone/iPad/iPod without iTunes
- Transfer, manage, export/import your music, photos, videos, contacts, SMS, Apps etc.
- Backup your music, photos, videos, contacts, SMS, Apps etc. to computer and restore them easily.
- Transfer music, photos, videos, contacts, messages, etc from one smartphone to another.
- Transfer media files between iOS devices and iTunes.
- Fully compatible with iOS 7, iOS 8, iOS 9, iOS 10, iOS 11 and iPod.


How to Transfer Files from iPad to iTunes Library
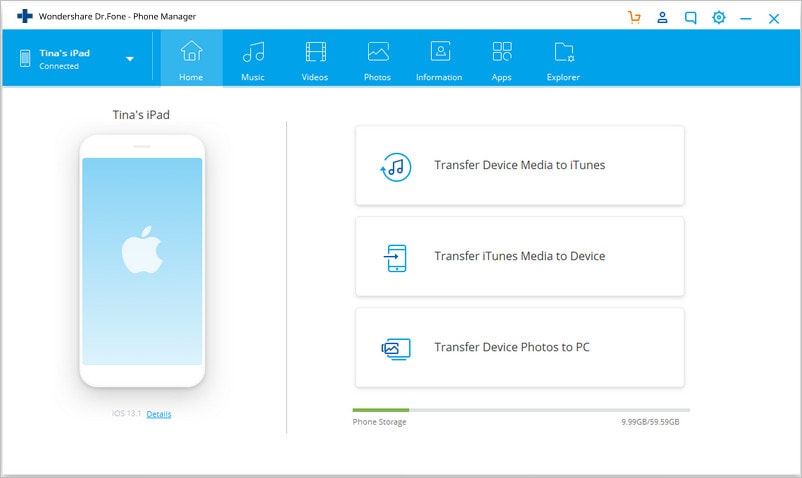
Step 1. Start Dr.Fone and Connect iPad
Download and install Dr.Fone on your computer. Run Dr.Fone and choose "Phone Manager". Connect iPad to computer with the USB cable, and the program will automatically detect it. Then you'll see different manageable file categories at the top of the main interface.
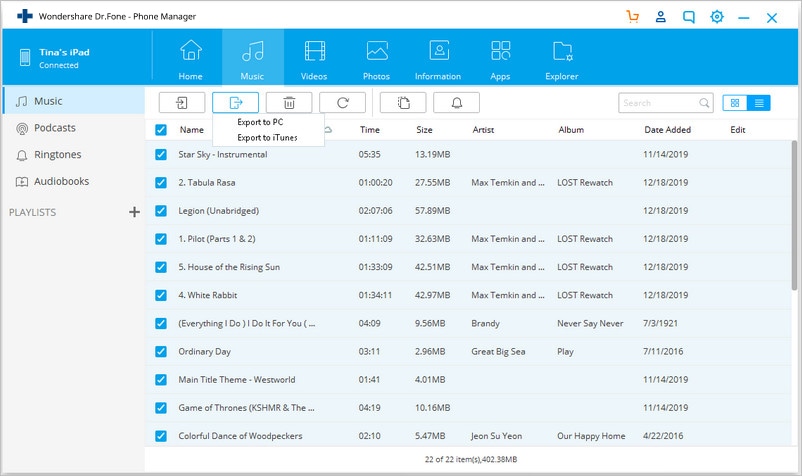
Step 2. Transfer Purchased and Non-Purchased Items from iPad to iTunes
Choose a file category in the main interface, and the program will show you the sections of the category along with the contents in the right part. Now select the files, purchased or non-purchased, and click the Export button at the upper left corner, then choose Export to iTunes in the drop-down menu. After that, Dr.Fone will transfer the items from iPad to iTunes library.
Related Articles:


iTunes Manage
- iTunes Backup
- 1. Does iTunes Backup Photos
- 2. Forgot iTunes Backup Password
- 3. Fix iTunes Corrupt Backup
- 4. Fix iTunes Backup Session Failed
- 5. Change iTunes Backup Location
- 6. View Files on iTunes Backup
- 7. Backup WhatsApp Using iTunes
- 8. Top 5 iTunes Backup Managers
- 9. Top 6 Free iTunes Backup Extractor
- 10. Backup iMessage Without iTunes
- iTunes Restore
- 1. Restore Photos from iTunes Backup
- 2. Restore Data from iTunes Backup
- 3. Restore WhatsApp Using iTunes
- iTunes Rebuild
- 1. Transfer iPad Purchases to iTunes
- 2. Transfer iPad Music to iTunes
- 3. Transfer iPod Music to iTunes
- 4. Transfer Android Music to iTunes
- 5. Import Multiple Lyrics to iTunes
- iTunes Transfer
- 1. Sync iTunes Media to iCloud
- 2. Sync iTunes Media to Android
- 3. Transfer iTunes Music to iPod
- 4. Transfer iTunes Music to Flash Drive
- 5. Transfer iTunes Music to Android
- 6. Transfer iTunes Music to Google Play
- 7. Put iTunes Audiobooks to Android
- 8. Copy iTunes Playlists to Hard Drive
- 9. Move iTunes Library to PC / Mac
- 10. Export iPhone Contacts from iTunes
- 11. Export Playlist from iTunes
- iTunes Plugins/Alternatives
- 1. Top 3 iTunes Plugins
- 2. Top 20 Alternatives to iTunes
- 3. Top 3 iTunes Alternatives for Android
- 4. Top 5 iTunes Remote for Android
- iTunes Problems
- 1. Fix iTunes Error 11
- 2. Fix iTunes Error 1100
- 3. Fix iTunes Error 2005/2003
- 4. Locked Out Of iTunes
- 5. Forgot iTunes Password
- 6. Account Has Been Disabled in iTunes
- iTunes Tricks
- 1. Change the iTunes Skin
- 2. Use File Sharing in iTunes
- 3. Use Home Sharing in iTunes
- 4. Recover iPhone Data from iTunes
- 5. See iTunes Purchase History
- 6. Get Free iTunes Cards Legally
- 7. iTunes Visualizers Download
- 8. Watch iTunes Movie on Android
- 9. Update iTunes On Your Computer
- 10. Install iTunes on Windows / Mac
- ● Manage/transfer/recover data
- ● Unlock screen/activate/FRP lock
- ● Fix most iOS and Android issues
- Manage Now Manage Now Manage Now
Alice MJ
staff Editor