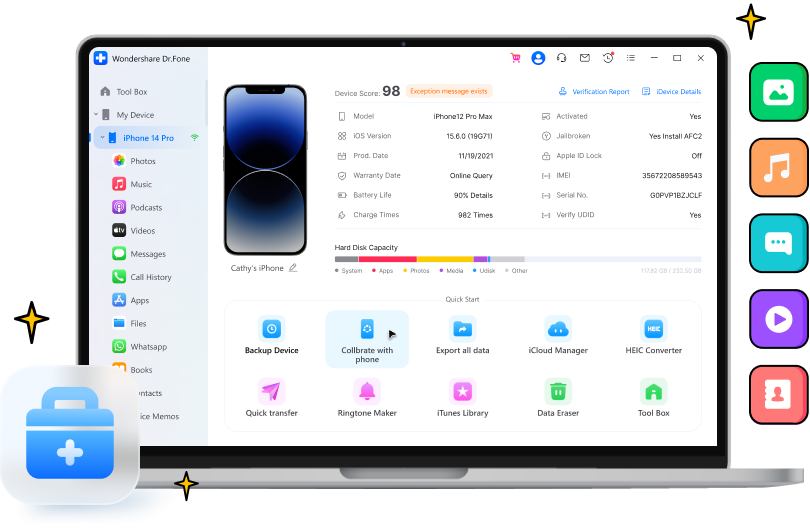
Get Real-Time Mobile Device Diagnostics

Is your smartphone or tablet in good health? Whether it's a used or new phone you just bought or an old device you're looking to sell, you can put it through a series of diagnostic tests for certifications or device history reports.
Basic device information (Model, color, etc.)
Hardware and parameters (Camera, battery, etc.)
Mobile device status (Unlocked, activated, jailbroken, etc.)
Professional report (Mobile device testing score)
(Currently supports Windows only)
More Features for You
iTunes Manager
Rebuild your iTunes Library and sync the media files like music, movies, TV shows, and playlists between iPhone/iPad/iPod touch and iTunes.
(Currently supports Windows only)
iCloud Manager
Dr.Fone helps to manage photos, videos, contacts, and other data from iCloud backups and sync them to any iOS device or computer.
Ringtone Maker
Make a custom ringtone for your iPhone or iPad! Intercept any part of your favorite song and turn it into a ringtone on iOS devices.
(Currently supports Windows only)
HEIC Converter
This utility makes it easy to batch-convert HEIC/HEIF photos to JPEG format without affecting the image quality.
3 Steps to Transfer Files from an
iPhone/iPad to a Computer
Step 1: Launch the program on your computer
Launch Dr.Fone and connect your iPhone or iPad to your computer.
Step 2: Back up your device on the computer
Click "Start Backup" to back up your device, and view the phone data.
Step 3: Manage your phone data in 1 click
Select the files you want to transfer, and export them to your computer.
Tech Specs
Processor
1 GHz or faster processor (Intel or AMD)
RAM
2 GB or more of RAM
Hard Disk Space
200 MB of available hard-disk space
Apple OS
Requires iOS 9.0 or later
Computer OS
Requires Windows 7 or newer
Requires mac OS X 10.8 & higher
Requires mac OS X 10.8 & higher
FAQs - You May Still Be Wondering
-
How to transfer files wirelessly between your iPhone and computer?The easiest and best way is to use Dr.Fone to transfer unlimited files from iPhone to Windows PC without a USB cable. Just follow the steps below:
Step 1. Launch Dr.Fone on your Windows PC.
Step 2. Download the Dr.Fone Link app on your iPhone.
Step 3. Connect your iPhone and computer to the same Wi-Fi network.
Step 4. Use Dr.Fone Link to scan the QR code or enter the cast code to connect both devices.
Step 5. Once connected, the powerful Dr.Fone file explorer enables you to access every corner of your Android storage. So you can browse all files and folders on it. -
How to transfer music to an iPhone without using iTunes?To transfer music to your iPhone without using iTunes, follow the step-by-step guide here:
Step 1. Launch Dr.Fone on your Windows PC or Mac computer.
Step 2. Connect your iPhone to the computer using a lightning cable.
Step 3. Click "iTunes Library" to transfer music from iTunes Library to your iPhone.
Step 4. To share music on local storage on the computer, select "Music" on the transfer window.
Step 5. Click "Export" to transfer them to your iPhone.
-
How to transfer photos from iPhone to PC using iTunes?To transfer photos from iPhone to PC using iTunes, follow the steps below:
Step 1. Install the latest version of iTunes on your computer.
Step 2. Launch Dr.Fone and connect your iPhone to the computer.
Step 3. Click on the "Device" icon on the left-top corner in iTunes.
Step 4. On the left sidebar on iTunes, click "Photos".
Step 5. Check the box before Sync Photos. Then, choose which photo album you want to sync.
Step 6. Click "Apply" to start syncing the photos from iPhone to PC using iTunes.
-
What to do if the computer doesn't recognize my iPod when I use Dr.Fone to manage iPod media files?If you are facing an issue with the recognition of your iPod when using Dr.Fone for managing media files, try the following solutions:
Method 1. Please set up the iPod as a hard disk in iTunes on your PC.
Method 2. Ensure the USB cable connectors are plugged in correctly, and the cables aren't damaged or frayed.
Method 3. Check the charge status of the iPod. If your iPod is not charged, the computer won't recognize the iPod when you connect it with Dr.Fone.
Method 4. Regardless of the provided methods, if the issue is not resolved, it is best to restart the iPod.
Method 5. You must update the operating system and software used on the iPod and the computer. Outdated software can also cause glitches and issues in such conditions.
For further help, refer to this comprehensive guide to fix the computer that won't detect the iPod.
All-in-One Data Manager Tool for Your Mobile Devices
When you need to transfer, manage, back up, restore data across devices, or mirror your screen to a PC, Dr.Fone helps you get it done—all in one place.
Phone Manager
Easily manage iOS/Android data and export to computer/iTunes/iCloud.
Phone Backup
Back up iOS/Android data to a PC and restore backups selectively.
Screen Mirror
Mirror, control, and record your mobile device screen on a Windows PC.


