How to Transfer Music from iPod Nano to iTunes

Feb 26, 2025 • Filed to: Manage Device Data • Proven solutions
Lost your iTunes library, including 2,000 fair-sounding songs, due to a computer crash or computer reinstallation? No matter what case you faced, if you hadn't backed up the iTunes library, you might lose all your songs in it. Even if you had backed up them on your iPod Nano, you can't transfer songs from iPod Nano to iTunes, for iTunes will erase all of them when syncing with your iPod Nano.
If you're bothered by it, luckily, you have come to the right place. Here is an iPod Nano to iTunes transfer tool: Dr.Fone - Phone Manager (iOS). It's well designed to empower you to transfer music from iPod Nano to iTunes quickly and easily. In addition, the information about the music, like play counts, ratings and skips, will be exported to your iTunes simultaneously. With this program, you can also copy music on iPod Nano, iPod Shuffle, iPod Classic to your computer for backup.
- Part 1. Transfer Music from iPod Nano to iTunes Easily with Dr.Fone - Phone Manager (iOS)
- Part 2. Rebuild iTunes Library to transfer iPod Nano to iTunes
- Video Tutorial: How to Transfer Music from iPod Nano to iTunes
Part 1. Move Music from iPod Nano to iTunes Easily with Dr.Fone - Phone Manager (iOS)
In the part below, I will explain how to move music on iPod Nano to iTunes library. The steps are quite simple. Please download and install this iPod Transfer program on your computer.
Dr.Fone - Phone Manager (iOS)
Transfer Music from Computer to iPod/iPhone/iPad without iTunes
- Transfer, manage, export/import your music, photos, videos, contacts, SMS, Apps etc.
- Backup your music, photos, videos, contacts, SMS, Apps etc. to computer and restore them easily.
- Transfer music, photos, videos, contacts, messages, etc from one smartphone to another.
- Transfer media files between iOS devices and iTunes.
- Support all iPhone, iPad, and iPod touch models with any iOS versions.


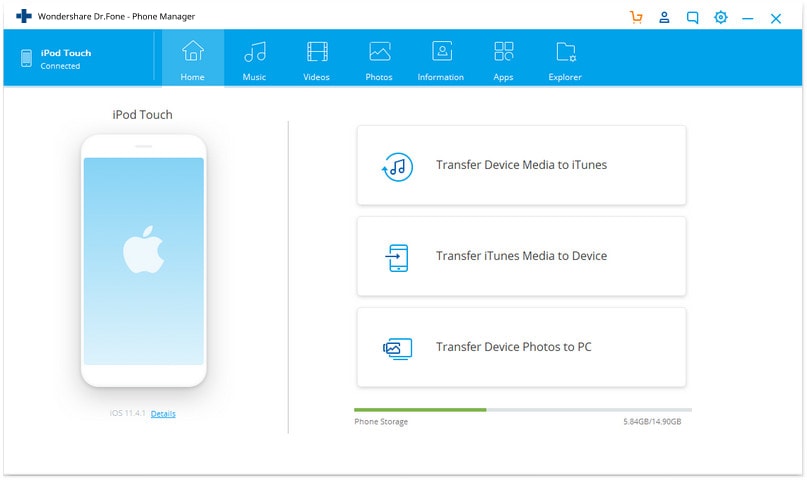
Step 1. Launch this iPod Transfer tool and connect iPod Nano with PC
The first thing after you install Dr.Fone - Phone Manager (iOS) is to launch it by double-clicking the icon on your PC screen. Then, have your iPod Nano connected to your PC via the USB cable. After this program detects it, select "Phone Manager" > Music" and you will find that media and playlist on your iPod Nano are shown in the left column.
Note: Please guarantee that iTunes has been installed on the computer to make sure this iPod Nano to iTunes transfer tool works properly.
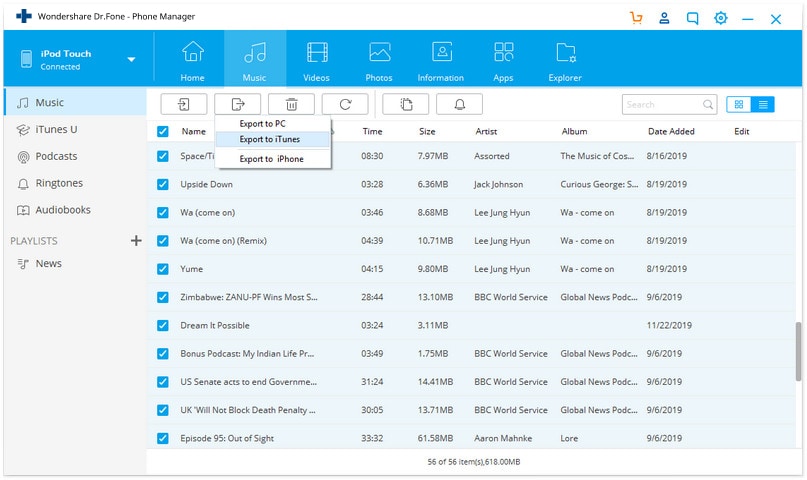
Step 2. Transfer music from iPod Nano to iTunes
Check the files you want to transfer from iPod Nano to iTunes, and click "Export > Export to iTunes". This iPod Nano to iTunes transfer tool will begins to export music immediately.
Note: The Dr.Fone - Phone Manager (iOS) works well with iPod Nano 7, iPod Nano 5, iPod Nano 6, iPod Nano 2, iPod Nano, iPod Nano 3 and iPod Nano 4. It also supports iPod Classic, iPod Shuffle and iPod Touch.
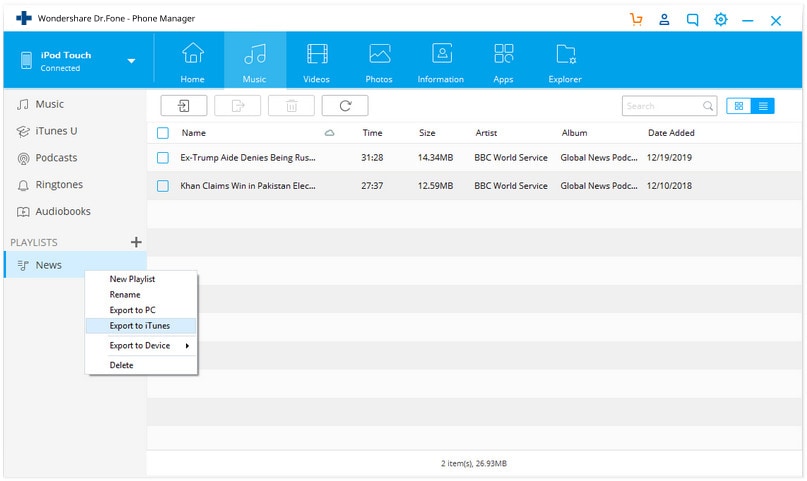
Transfer Playlist from iPod Nano to iTunes
Besides transferring songs, you're able to transfer playlist from iPod Nano to iTunes library. Click "Playlist" tab on the left column and choose your wanted playlists and then click "Export to iTunes".
During the transfer, remember that your iPod Nano should be kept connecting to the computer all the time.
Part 2. Rebuild iTunes Library to transfer iPod Nano to iTunes
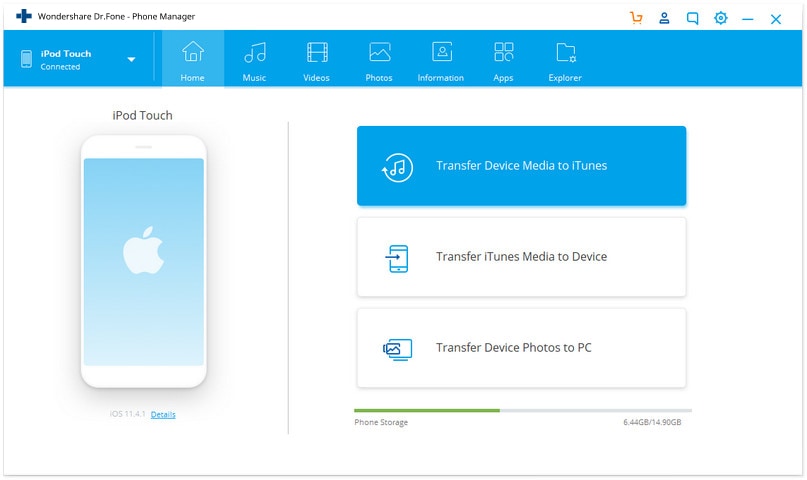
There is another way to transfer music from iPod Nano to iTunes with Dr.Fone - Phone Manager (iOS) - Transfer Device Media to iTunes. Follow the steps below to Transfer to iTunes simply.
Step 1 Launch Dr.Fone - Phone Manager (iOS) and connect your iPod Nano with the computer. Click "Transfer Device Media to iTunes" icon on the main interface.
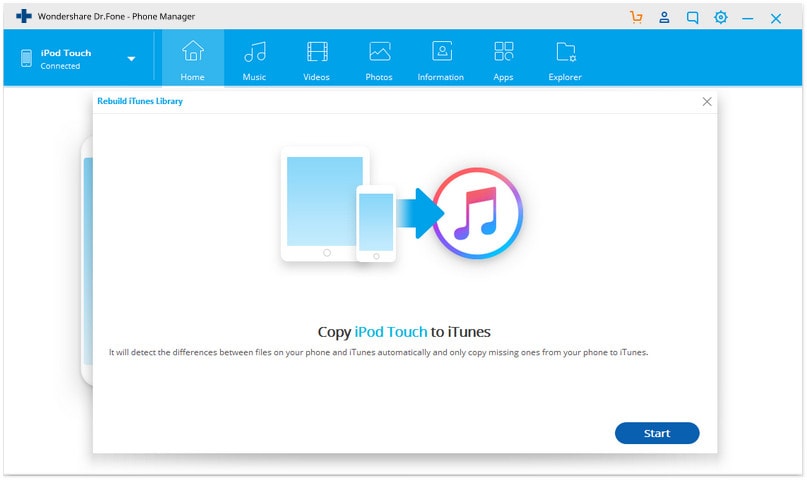
Step 2 Click "Start" to comfirm to transfer music from iPod Nano to iTunes.
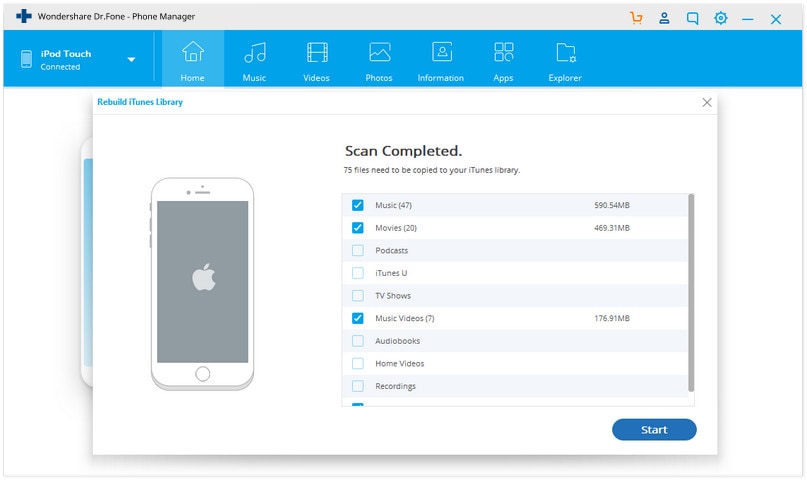
Step 3 You can select the music, videos, poadcasts, music videos ect from iPod Nano to iTunes as screenshots.
Well, it's quite easy to sync music from iPod Nano to iTunes. Why not download this program to have a try?
Dr.Fone - Phone Manager (iOS) is mainly to transfer music, photos, videos, playlists from your iPhone, iPad& iPod to iTunes Library& PC for backup, to manage music and photos freely with a relatively competitive price.


iPod Transfer


Alice MJ
staff Editor