How to Root Any HTC Device in One Click

Feb 29, 2024 • Filed to: Latest News & Tactics • Proven solutions
Do you want to move past the manufacturer boundaries on your device? If your answer is yes, then you have certainly reached the right place. Simply root your device and make the most out of it. In this comprehensive post, we will help you root your HTC device without facing any setback.
Change the way you use your mobile, remove the system apps that bother you or install the apps that your system does not accept. Bend the system according to your will. You can do all of this and more, only if you know how to root your device. If unnecessary advertisements bother you, feel free to remove them. All of this is possible, only after you root your device. Let’s get started and unlock your HTC device.
Part 1: Root HTC Devices with HTC Quick Root Toolkit
HTC root wasn’t rocket science at all. In fact, the process is quite handy and completely safe. If you want to experiment a different method, you can give HTC Quick Root toolkit a try as well. Besides Android Root, this is one of the most feasible and safe options. A simple guide to help you use this toolkit to root your device is given below. Go through the steps below to know how to root HTC One using HTC Quick Root Toolkit.
1. You can install the application from here. Extract the file to a separate folder once it is downloaded.
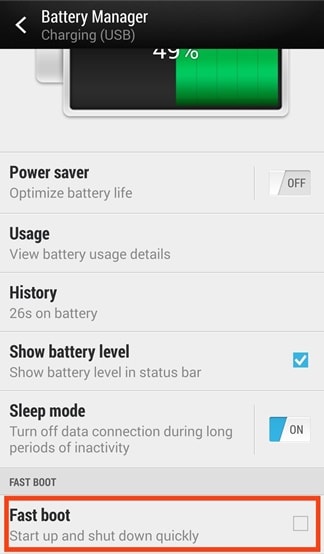
2. You need to disable “fastboot” on your gadget, which you can be done simply by going into ‘settings’, followed by ‘power’ and then finally disable ‘fastboot’.
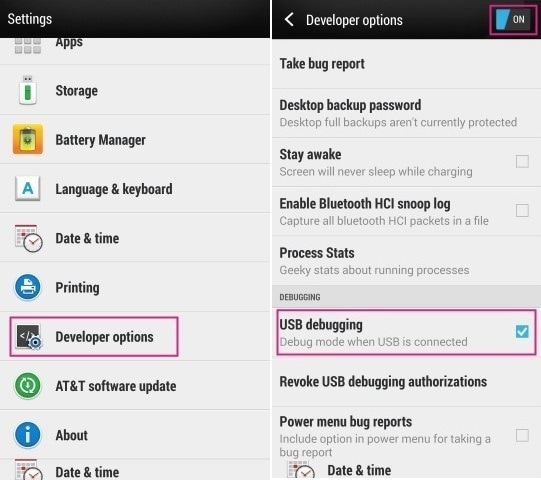
3. You also need to enable USB debugging, which you can be done by going to settings, developer options and finally checking the USB debugging box.
4. Now, you are completely ready to commence. Connect your phone via HTC or any other USB cable and open the folder on your system where you have extracted the downloaded file.

5. Launch the application by running the .exe file. Wait a few seconds for your device to be detected.
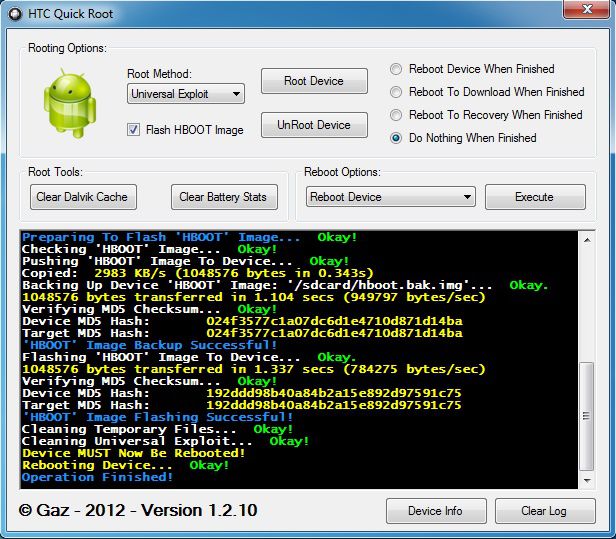
6. You would get two options of rooting your device, namely “Insecure Boot” and “Universal Exploit Method”.
7. It is recommended to use Universal Exploit Method to root your device if your device is running on full stock. Whereas, if you have an S-OFF phone, then you definitely have to go for Insecure Boot method.
8. Whatever method you choose, click “Root” and then just follow the on-screen commands. In a few moments, your device will be successfully rooted.
Part 2: Backup HTC Phone before Rooting
Now when you know about some of the best ways to root your HTC device, you can simply pick the one you like the most. These applications have made our lives extremely easy, but rooting has some issues as well. All of your data can be erased in the process. To avoid this situation, it is recommended to save your data as backup beforehand. The best way to create a backup of all your data is by using Dr. Fone. The easy set of instructions to know do so is given below.
Dr.Fone - Android Data Backup & Resotre
Flexibly Backup and Restore Android Data
- Selectively backup Android data to computer with one click.
- Preview and restore backup to any Android devices.
- Supports 8000+ Android devices.
- There is no data lost during backup, export or restore.


Creating a backup has never been so easy. When you root HTC One, you can be sure that your data is safe and you can always restore it after the root operation. HTC root is not a complicated process, as it just has a few add-ons as compared to other Android devices. With the advanced backup option in your hand and the knowledge of how to root HTC One, you can securely cross the boundaries restricted by manufacturers and use your mobile to its full potential.
Numerous HTC supporters have rooted their devices using the application mentioned in this article and all have given positive feedback. Perform HTC root and experience your device on a whole new level. Experiment what your device can really do by unleashing its potential and customize it on the go. You will observe a whole new side of it and have an unforgettable experience using your device.


Android Root
- Generic Android Root
- 1. Text Message Apps for Android
- 2. Root Android ONE Devices
- 3. 30 Useful Android Root Apps
- 4. Best Android Root File Managers
- 5. Get Root Access with Computer
- 6. Delete Preinstalled Apps on Android
- 7. Get Free In-APP Purchase
- 8. Wifi Hotspot Apps without Rooting
- 9. Get Root Access on Android
- 10.Root Android Devices
- 11.Root Android Phones and Tablets
- 12.Root Smartphone on Android
- 13.Why Root Android and How to Root it
- 14.Root Android 4 Series in Two Ways
- 15.Tools to Root Android Online
- Specific Android Root
- 1. Root Samsung Galaxy S7& S7 Edge
- 2. Root LG Devices with Root Script
- 3. Samsung Root Software to Root
- 4. Root Motorola Devices
- 5. 2 Solutions to Root ZTE Devices
- 6. Solution to Root Huawei P9 Safely
- 7. 2 Methods to Root Nexus 7 Easily
- 8. Solutions to Root Sony Devices
- 9. Root Any HTC Device in One Click
Alice MJ
staff Editor