Solution to Root Huawei P9 Safely

Sep 01, 2023 • Filed to: Latest News & Tactics • Proven solutions
P9 is one of the most successful and widely used smartphones produced by Huawei. It is equipped with plenty of high-end specifications and can be your favorite in no time. Though, just like any other Android smartphone, it also comes with a few limitations. For instance, only after the Huawei P9 root, you can install a custom ROM or block ads on your device. If you wish to root Huawei P9, then you have come to the right place. In this quick and informative tutorial, we will make you familiar with two different ways to perform Huawei P9 lite root.
Part 1: Before you begin rooting Huawei P9
You might already know the added benefits of rooting. You can easily customize your phone, install apps from different sources, block ads, uninstall inbuilt apps, and perform a wide range of other tasks. Though, before you proceed and learn how to root Huawei P9, it is import to prepare your device and get familiar with these points.
1. Before you commence the rooting process, it is important to take a backup of the data on Huawei P9. If the rooting is halted in between or is not successful, then you might end up losing your data.
2. Additionally, it is important to note that after rooting your Huawei device, you would void its warranty. Nevertheless, all the perks and benefits of rooting make it a risk worth taking.
3. To make sure that your device would function properly during the entire process, it is important to charge its battery to at least 60%.
4. Also, download the important drivers of your Huawei device before commencing the rooting process.
5. Your phone’s firmware or anti-virus can sometimes stop the process of rooting. It is recommended to turn it off before you root Huawei P9.
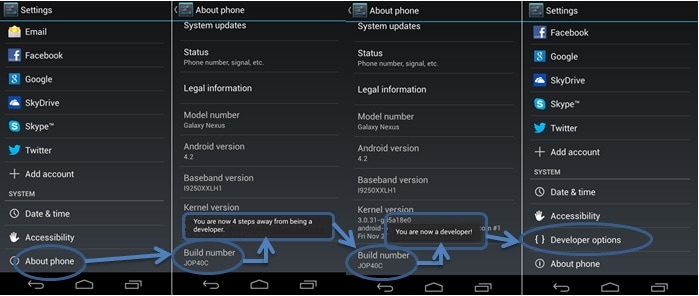
6. Lastly, turn on the option of USB Debugging on your device. To do this, firstly visit the “About Phone” section under Settings and tap the “Build Number” option seven consecutive times. This will enable the Developer Options on your device. Now, just visit the Developer Options feature and turn on USB Debugging.
Great, now when you are familiar with all the prerequisites associated with the rooting process, let’s understand the Huawei P9 root technique.
Part 2: How to root Huawei P9 with TWRP Recovery
With Android Root, you can perform Huawei P9 root in a secure and reliable way in a single click. Nevertheless, if you are looking for an alternative, then you can give TWRP Recovery a try. It stands for Team Win Recovery Project and can help you to install third-party apps on your device. You can follow these steps to root your Huawei device with TWRP recovery.
1. In order to start, you are supposed to flash TWRP recovery on your device. Firstly, download Odin and the TWRP recovery image file for your Huawei phone from its official website.
2. Great! Now, to commence the process, put your Huawei phone to its bootloader mode by pressing the Home, Power, and Volume Down button at the same time.
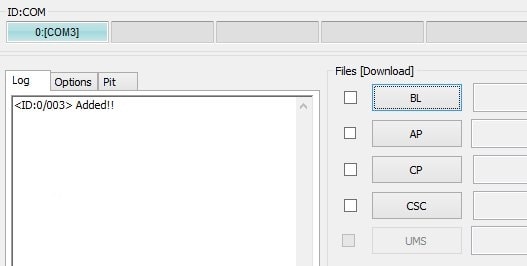
3. Afterward, connect your Huawei phone to your system using a USB cable. Additionally, you need to have the essential USB drivers for your phone ready. As you would launch Odin, it will automatically detect these files and turn the ID:COM indicator blue.
4. Now, click on the AP button and select the TWRP image file that you have recently downloaded on your system.
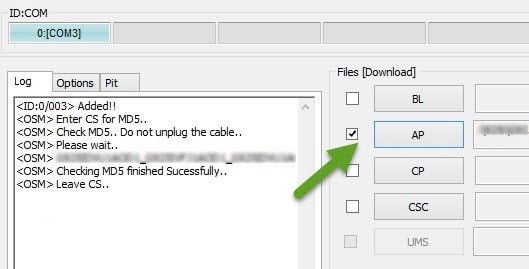
5. After loading the file, click on the “Start” button. The interface will display a “Pass” message whenever it is done.

6. Download a stable version of SuperSU in order to perform Huawei P9 lite root. Just unzip the respective file and copy the SuperSU zip file to your Huawei phone.
7. Now you can also unplug your device from your system. Put it into the TWRP recovery mode by pressing the Home, Power, and Volume Up button simultaneously.
8. As soon as you would enter the TWRP recovery mode, tap on the Install button. Select the SuperSU file that you have just stored on your device and install it.
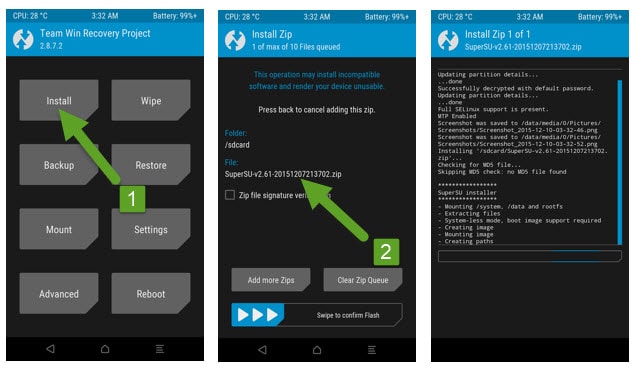
9. Just wait for a while as your phone would flash the SuperSU files. Simply restart it when it is done to complete the process successfully.
Congratulations! You have just learned two different ways to perform the Huawei P9 root. Select your preferred option and root your device right away. Make sure that you have read all the prerequisites to perform the rooting operation without any trouble.


Android Root
- Generic Android Root
- 1. Text Message Apps for Android
- 2. Root Android ONE Devices
- 3. 30 Useful Android Root Apps
- 4. Best Android Root File Managers
- 5. Get Root Access with Computer
- 6. Delete Preinstalled Apps on Android
- 7. Get Free In-APP Purchase
- 8. Wifi Hotspot Apps without Rooting
- 9. Get Root Access on Android
- 10.Root Android Devices
- 11.Root Android Phones and Tablets
- 12.Root Smartphone on Android
- 13.Why Root Android and How to Root it
- 14.Root Android 4 Series in Two Ways
- 15.Tools to Root Android Online
- Specific Android Root
- 1. Root Samsung Galaxy S7& S7 Edge
- 2. Root LG Devices with Root Script
- 3. Samsung Root Software to Root
- 4. Root Motorola Devices
- 5. 2 Solutions to Root ZTE Devices
- 6. Solution to Root Huawei P9 Safely
- 7. 2 Methods to Root Nexus 7 Easily
- 8. Solutions to Root Sony Devices
- 9. Root Any HTC Device in One Click
James Davis
staff Editor