2 Methods to Root Motorola Devices and Enjoy Its Full Potential

Sep 01, 2023 • Filed to: Latest News & Tactics • Proven solutions
Now many people do not know what rooting an Android phone is. Well, just as iPhones are jailbroken, Android phones are rooted. Rooting an Android phone opens it up so you have administration rights over the device. You can install and uninstall any app that you would like. It allows you to place tools that normally would not work with a locked Android phone. Here you will see several ways in which you can root Motorola phones.
Part 1: Root Motorola Devices with Fastboot
The Android SDK comes with a nifty little tool called Fastboot, which you can use to root your Motorola device. Fastboot starts on the device before the Android system loads, and it is therefore useful in rooting and updating the firmware. The Fastboot method is rather complicated because it has to be operated from two ends – on the Motorola and on the computer. Here you will learn how to safely use Fastboot to root your Motorola.
Step-by-step instructions of how to root a Motorola device using Fastboot
Step 1) Download ADB and Android SDK
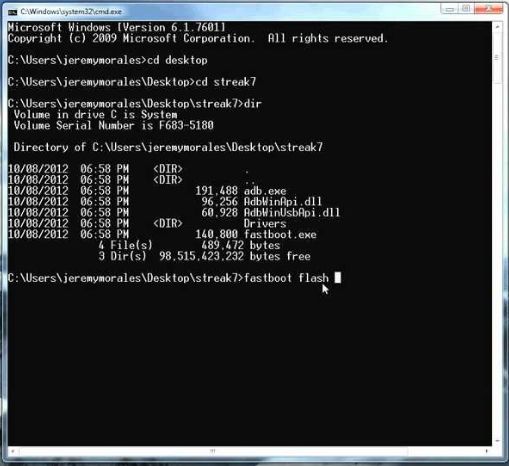
Fastboot comes with Android SDK, so it would be best that you download the latest one and install it. Once doe, you can now Run Fastboot on your computer and Motorola with ease. Connect the computer and the Motorola using the USB cable that came with it. In the Android SDK folder, press Shift and Right Click on any empty area. You will be asked to choose “Open Command Prompt Here”. Type “adb devices” in the command prompt. You will now see the Serial Number of your Motorola, meaning that it has been recognised.
Step 2) Enable USB debugging on your Motorola
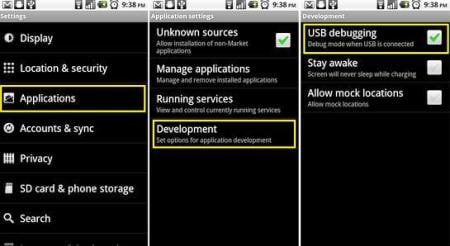
Go to the app drawer and click on the “Settings” icon. Go to “About Phone”, and then go to the “Build Number”. Tap on this 7 times, until you get a message that says you are now a developer. Go back to the settings page and there will be a new option that says “Developer Options”. Click on this and then enable “USB Debugging”. When USB debugging is complete, you will get a popup message on the phone that asks “Enable USB Debugging?” and click on “Always allow from this computer” and tap OK.
Step 3) Run commands to unlock the phone and gain access to the root
Type in the following commands in the command prompt. They must be typed exactly as they are.
adb shell
cd /data/data/com.android.providers.settings/databases
sqlite3 settings.db
update system set value=0 where
name='lock_pattern_autolock';
update system set value=0 where
name='lockscreen.lockedoutpermanently';
.quit
This will unlock the phone and you will have access to the root.
Part 2: Root Motorola Devices with PwnMyMoto App
PwnMyMoto is an application that enables you to root Motorola Razr; the device must be running on Android 4.2.2 and above. This s an application that exploits three vulnerabilities in the Android system to gain access to the root, then allow write to the root system. There is no hacking involved when you use this application, and it is completely safe. In order to root your Motorola using PwnMyMoto, here are the steps to follow
Step-by-step instructions on rooting a Motorola device using PwnMyMoto
Step 1) Install the app
Go to the PwnMyMoto download page and download it as an APK. Now install it by opening the command prompt and typing “adb install –r PwnMyMoto-.apk. You may also download the APK directly to your Motorola and then click on the PwnMyMoto APK when you search for it using the file explorer in the phone
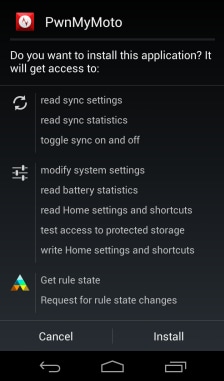
Step 2) Run PwnMyMoto
Once the application has been installed, you can now go to the apps menu and click on the PwnMyMoto icon. The phone will reboot twice or thrice depending on your rooting status. After the last reboot, the device will have been rooted.
Rooting your Motorola allows you to have developer access to the system, and you can customize your phone in any manner that you wish. You should exercise caution when you are rooting your phone. It is advisable to backup your device before you attempt to root it.


Android Root
- Generic Android Root
- 1. Text Message Apps for Android
- 2. Root Android ONE Devices
- 3. 30 Useful Android Root Apps
- 4. Best Android Root File Managers
- 5. Get Root Access with Computer
- 6. Delete Preinstalled Apps on Android
- 7. Get Free In-APP Purchase
- 8. Wifi Hotspot Apps without Rooting
- 9. Get Root Access on Android
- 10.Root Android Devices
- 11.Root Android Phones and Tablets
- 12.Root Smartphone on Android
- 13.Why Root Android and How to Root it
- 14.Root Android 4 Series in Two Ways
- 15.Tools to Root Android Online
- Specific Android Root
- 1. Root Samsung Galaxy S7& S7 Edge
- 2. Root LG Devices with Root Script
- 3. Samsung Root Software to Root
- 4. Root Motorola Devices
- 5. 2 Solutions to Root ZTE Devices
- 6. Solution to Root Huawei P9 Safely
- 7. 2 Methods to Root Nexus 7 Easily
- 8. Solutions to Root Sony Devices
- 9. Root Any HTC Device in One Click
James Davis
staff Editor