4 helpful solutions to fix Face ID that's Not Working On iPhone iOS 13
Normal glitches, problems can occur in any random point. One such is when you’re trying to use the Face ID but the message of “Face ID is not available”, “Try Setting up Face ID later” comes up. This follows right after you’ve updated to the latest iOS 13 version. Well, to resort this error, we’ve collated down 4 useful means of fixing up this issue completely. Follow these fixes for Face ID not working on iPhone X.
Part 1. Scenarios that your Face ID can’t work
There are several reasons why your face id can’t work after updating to iOS 13. Below are the enlisted scenarios where Face ID does not work on iPhone:
- Ensure that TrueDepth camera is not covered with any case or screen protector, so that it is able to detect your device.
- See if your iPhone is placed in the right orientation especially when you are using the Portrait mode.
- Your eyes, nose, mouth are clearly visible to the TrueDepth camera.
- While, you are out in the sun, make sure the sun is not behind you.
- Make sure that the device is placed at an arm’s length, at about 10-20 inches from your face.
Part 2. Try to reboot your iPhone
If the Face ID can’t work after updating to iOS 13, one of the prime solutions to resolving this problem is by rebooting your respective iPhone. This allows to combat any small glitches that might be hampering in Face ID. For different models, we’ve collated the steps right below:
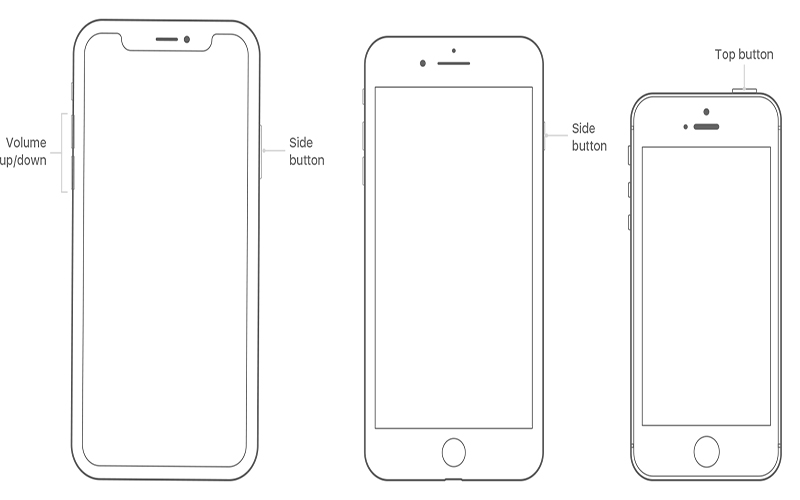
Restart iPhone X/ XR/XS:
- Hold and press the “Side” button and either the volume down until the power off slider appears over your screen.
- Slide the slider to switch off the device completely off.
- Once the device switches off, just hold the “Side” button again after you see the Apple’s logo glows over the screen.
Restart iPhone 8 or previous versions:
- Just hold the “Top” or “Side” button until power off slider surfaces over.
- Simply, drag slider to turn off your device.
- After device turns off, hold the “Top” or “Side” button again until the “Apple” logo comes up.
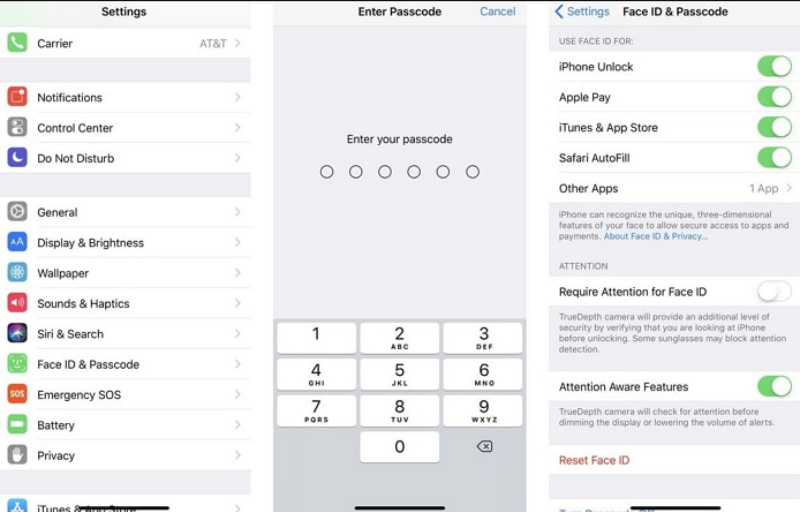
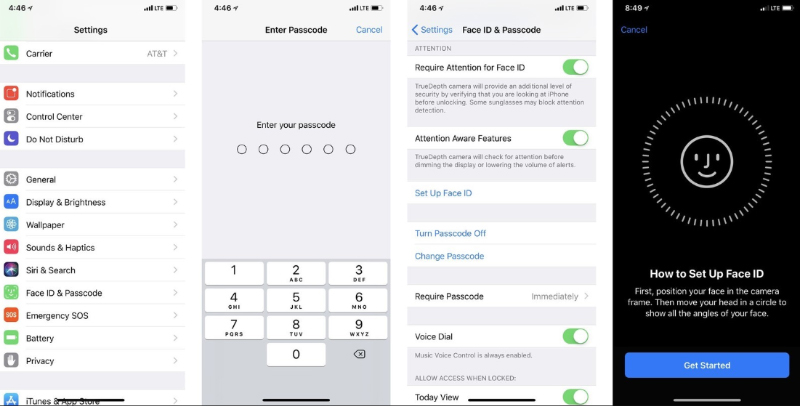
Part 3. Reset face ID on your iPhone
One way to fix the Face ID not working on iPhone X glitch is by resetting the existing Face ID available on your iPhone. By opting for this means, you can completely discard all the Face IDs and set afresh. Just follow the steps mentioned below to reset the Face ID on your iPhone.
- Load “Settings” app from the home screen or app drawer.
- Pick the “Face ID & Passcode” option.
- Under this option, select “Reset Face ID”.
-
Then, click on the “Set up Face ID”.
-
After that, follow the on-screen commands for resetting the Face ID.
Quickly reboot the iPhone. Check if the problem of iPhone is working on iPhone X or not.
Part 4. Register a new face ID appearance
Ever since your device has been updated to iOS 13, you’re trying to use the Face ID but that just doesn’t work out for you? You know, sometimes your iPhone might be finding it hard to recognize your face or appearance. Sounds crazy? Well, it is. But, no problem, you can register for a new Face ID by following the steps mentioned below:
- Just, go to “Settings” menu from your iPhone.
- Pick the “Face ID & Passcode” option and click on “Set up an Alternate appearance” option.
- While, setting the face, just make sure your face is in the right direction.
- On your iPhone, just go to “Settings” and pick the “General” option.
- Select the “Reset” option and click on “Reset All Settings”.
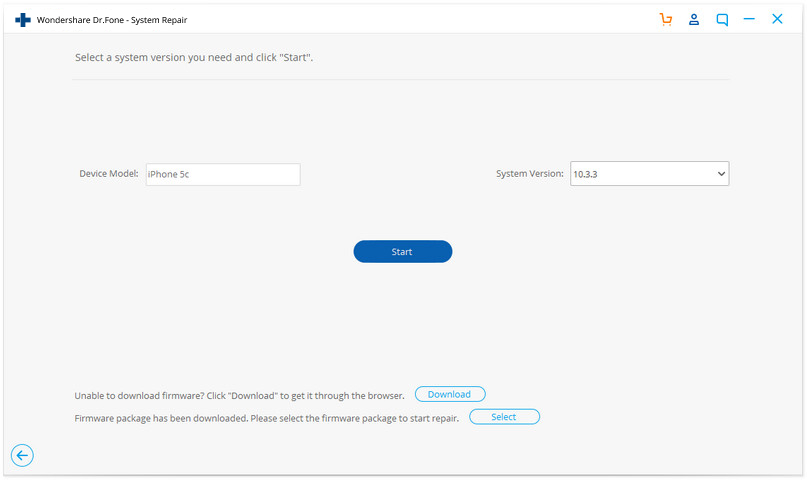
- You will first require an IPSW file. Simply, go to https://ipsw.me and select iPhone from the available tabs.
- Pick up the desired model that you are currently using.
- After this, select the iOS version that you’re wanting to downgrade to and click on “Download”.
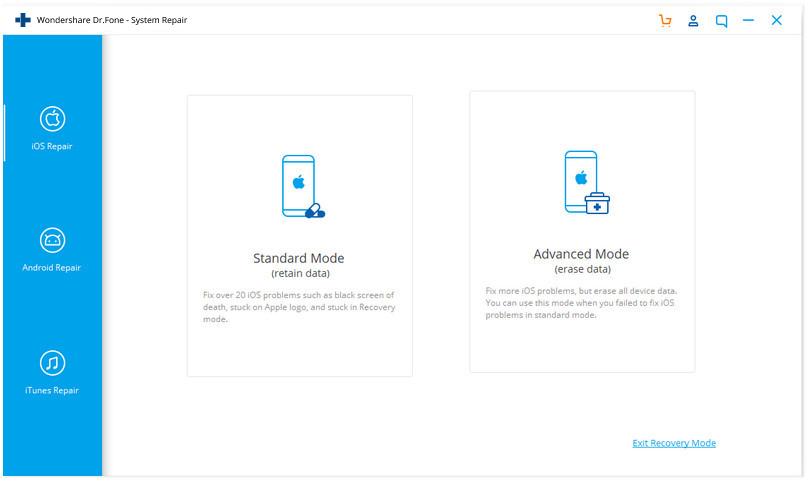
- Only fix your iOS to normal, no data loss at all.
- Fix various iOS system issues stuck in recovery mode, white Apple logo, black screen, looping on start, etc.
- Downgrade iOS without iTunes.
- Works for all models of iPhone, iPad and iPod touch.
- Once the download kick starts, use dr.fone – Repair in order to flash that IPSW file on iPhone.

Part 5. Reset all settings on your iPhone iOS 13
The settings used in your iPhone can be the prime cause of why Face ID can’t work even after updating to iOS 13.You might have set any settings that would be coming in between the normal functioning of Face ID. The best way to deal this problem is to reset all the settings on your iPhone iOS 13. This will prompt the settings to factory state. It’s really simple, follow the steps right below-

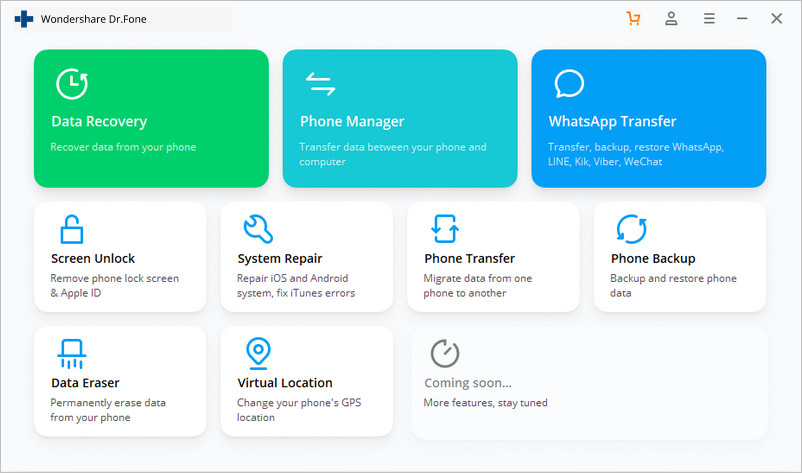
Part 6. how to downgrade ios 13 to previous version by dr. fone – Repair
If you’re not satisfied with the iOS 13 version, you can downgrade to the previous iOS version. Just download the IPSW file and repair it. For that, use the powerful tool i.e. dr.fone – Repair. And, you will successfully get downgraded to the lower version. Moreover, dr. fone – Repair is capable of repairing almost all sort of iOS related issues be it black/white screen of death, stuck on apple logo, or reboot loop. This one stop solution will effortlessly bring your device back to normal.
Step by step Tutorial
dr.fone - Repair
Uninstall iOS 13 beta and downgrade to official iOS.
Here are the detailed steps for using dr.fone Repair tool.
Step 1: Launch dr.fone Repair (iOS) on PC