All the Workarounds you Need to Fix the issue iPhone 4S/5S/6/7/8/X Screen is Black but Phone is on
“My iPhone won’t turn on past the Apple logo. Whenever I switch it on, it displays a black screen and doesn’t respond. Can someone tell me how to fix iPhone X screen won’t turn on problem?”
While iPhone is known for its high-quality experience, there are times when users face unwanted issues with it. For instance, this is one of the queries posted by an iPhone X user about the screen turning black even when the device is switched on. The truth is – the iPhone black screen won’t turn on is quite a common problem, faced by numerous users. The good news is that there are several native as well as third-party solutions that can fix it easily. Without much ado, let’s learn what to do when iPhone 5/6/7/8/X screen is black but phone is on.

- Part 1: Solutions to Fix Firmware Issues on your iPhone
- Part 2: Better iTunes Alternative to fix iPhone: dr.fone - Repair (iOS)
- Part 3: Get the Device Checked for Hardware Problems in Apple Store
Part 1: Solutions to Fix Firmware Issues on your iPhone
Mostly, it has been observed that the iPhone screen black but still on issue is caused by a firmware related problem. To fix this, you can forcefully restart your device or simply boot it in the DFU/Recovery mode.
1.1 Boot your iPhone in DFU Mode
This is one of the most effective solutions to fix all kinds of firmware-related issues with iOS devices. A while back, when my iPhone won’t turn on past the Apple logo, I restarted it in the DFU mode. By taking the assistance of iTunes, I was able to reset my iPhone. Ideally, this fixed situation that the iPhone 6 screen is black but phone is on, but also deleted all the existing content on it. Therefore, if you follow this solution, please note that this will restore your iPhone to factory settings by getting rid of all the existing data from it.
DFU stands for Device Firmware Update that lets us upgrade the device to the latest firmware version. To fix iPhone screen not turning on, we will first boot the device in DFU mode and later use iTunes to update it. Here are the different key combinations to boot iPhone in DFU mode with respect to their models.
For iPhone 6s and older models
Step 1. Connect your iPhone to the system and launch iTunes on it. Turn it off, if it isn’t already.
Step 2. Now, press and hold the Power key and the Home button at the same time. Keep holding them for 10 seconds.
Step 3. Afterward, release the Power key while still holding the Home button for the next 5 seconds.
Step 4. Let go when the device enters the DFU mode.

For iPhone 7 and 7 Plus
Step 1. Firstly, launch iTunes on your computer and connect your iPhone 7/7 Plus to it.
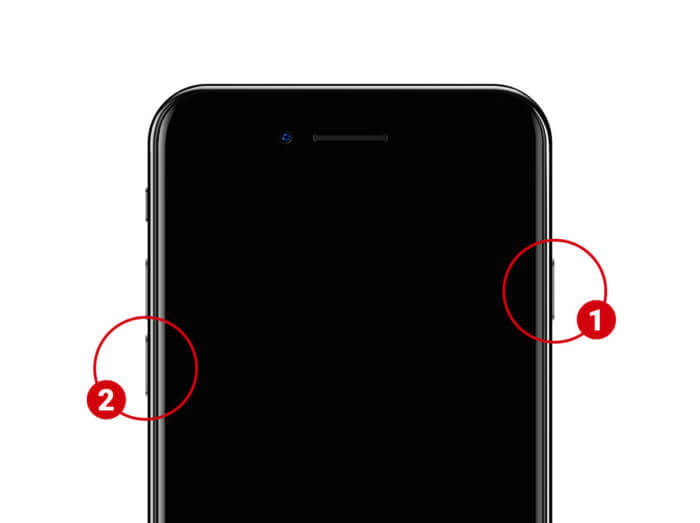
Step 2. Make sure that your device is turned off beforehand. Now, press and hold the Power + Volume Down buttons at the same time.
Step 3. After holding them for 10 seconds, let go of the Power button but keep holding the Volume Down key.
Step 4. Only hold the Volume Down key for 5 seconds and let go once your device boots in the DFU mode.
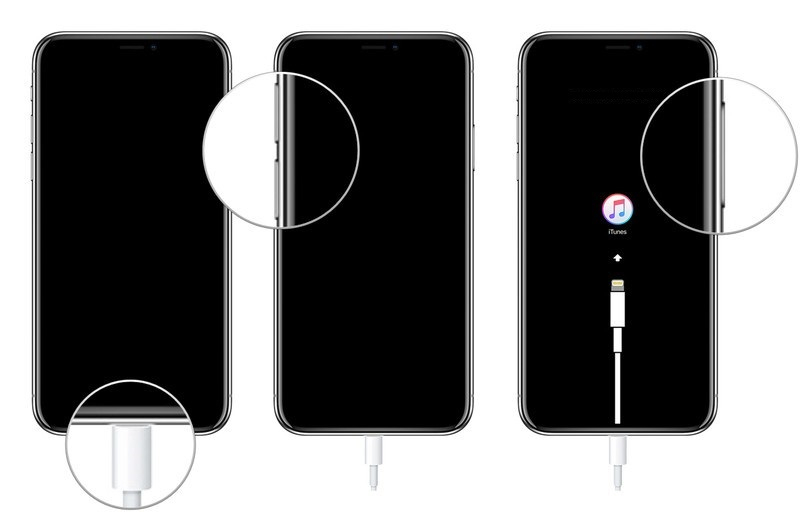
For iPhone 8 and newer models
Step 1. Connect your iOS device to Mac/Windows using a lightning cable and launch iTunes on it.
Step 2. Firstly, you need to turn it off by pressing the Side key.
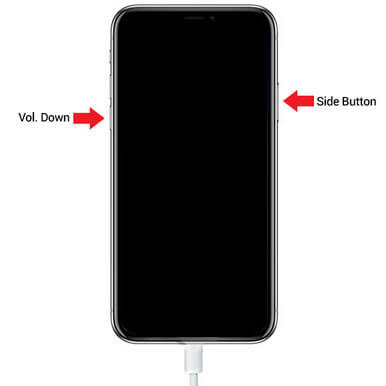
Step 3. Once it is off, hold the Volume Down and the Side keys at the same time for around 10 seconds.
Step 4. After that, release the Side key, but keep holding the Volume Down key for the next 5 seconds.
Step 5. Release the Volume Down key once your device boots in the DFU mode.
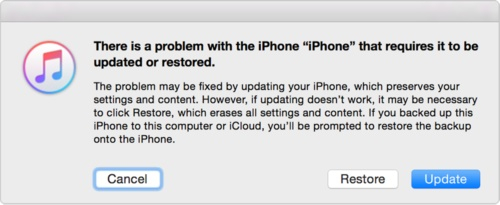
If your device displays the Apple logo or the iTunes screen, then it means you have made a mistake and should start the process from the start. As soon as your device boots in the DFU mode, iTunes will detect it and display the following prompt. Just agree to it and restore your device by following the on-screen instructions.
1.2 Boot iPhone in Recovery Mode
If the DFU mode is not able to fix the iPhone X/8/7/6 screen won’t turn on, then you can take the assistance of recovery mode instead. While DFU mode skips the default bootloader of the device, recovery mode flashes it first. That’s why we can downgrade or upgrade a device with the DFU mode. On the other hand, Recovery Mode will make sure that you can only upgrade your iDevice.
Just like DFU mode, the Recovery Mode will also take the assistance of iTunes to restore your device to its factory settings. Therefore, this would also end up erasing the saved data and settings from your phone. Though, the key combinations to boot an iPhone in Recovery Mode are a bit different.
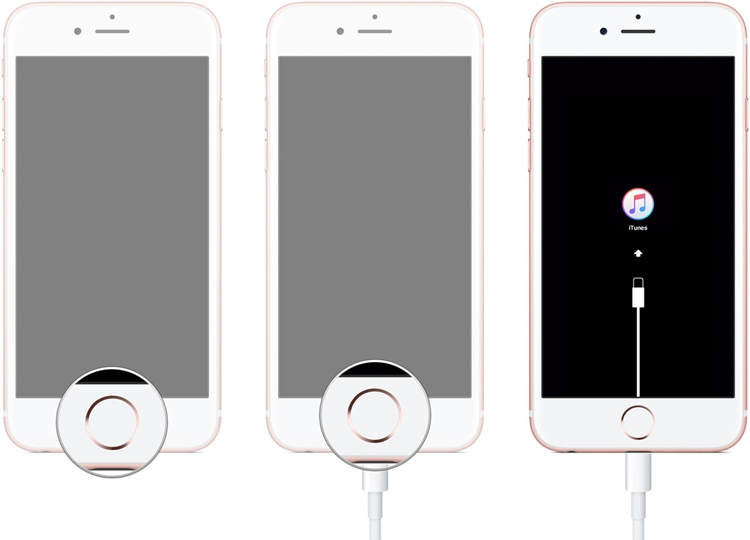
For iPhone 6s and previous models
Step 1. Launch iTunes on your computer and make sure your phone is turned on beforehand.
Step 2. Press the Home button on the device while connecting it to the system.
Step 3. Let go of the Home button when the iTunes symbol on the device screen appears.
For iPhone 7 and 7 Plus
Step 1. Using a working cable, connect your iPhone to the system and launch iTunes on it. Turn off your phone in advance.
Step 2. While connecting, press the Volume Down button and hold it for a while.
Step 3. Let go once the connect-to-iTunes symbol would appear on the screen.

For iPhone 8 and later models
Step 1. Turn off your device and use a working cable to connect your iPhone to the system. At the same time, launch the latest version of iTunes on it.
Step 2. Hold the Side button and keep pressing it while connecting it to your system.
Step 3. Release it after getting the iTunes symbol on the screen.
Once iTunes will detect that your device has entered the recovery mode, it will notify you with a pop-up screen. Just agree to it and choose to restore your device. Wait for a while as your iPhone is restarted with factory settings. Most likely, this will fix iPhone 5/6/7/8/X screen is black but phone is on issue.

1.3 Charge the Device and Force Restart it
Whenever my iPhone won’t turn on past the Apple logo, I make sure that the phone is charged enough. Chances are that there could be no or minimum power on your device, causing it to shut down. Alternatively, it could have been crashed as well. The easiest way to fix iPhone screen not turning on is by force restarting your device. Since it won’t cause any data loss or unwanted harm to your device, it would be a quick fix.
Before you force restart your device, just connect it to a power source first and make sure it is charged enough. Afterward, you can apply the following key combinations to restart it forcefully.
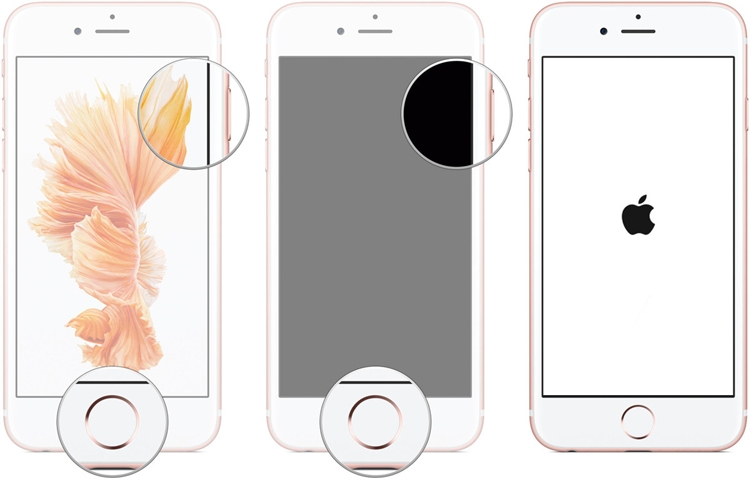
For iPhone 6s and older models
Step 1. Firstly, press the Home and the Power buttons at the same time.
Step 2. Keep holding both the buttons for at least 10 seconds.
Step 3. Let go as the device would restart and the Apple logo appears on screen.
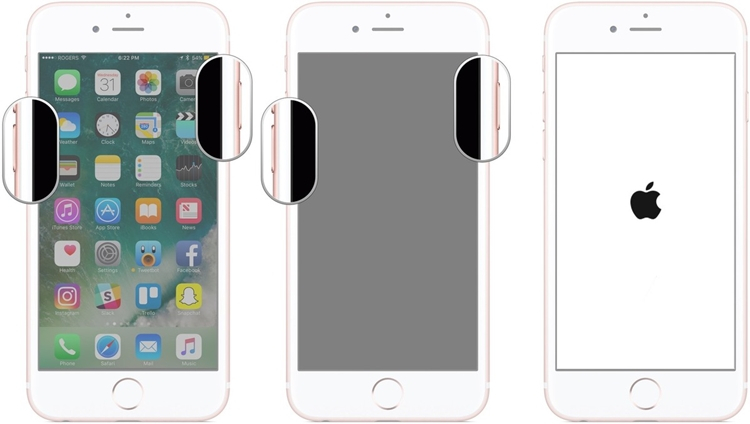
For iPhone 7 and 7 Plus
Step 1. Press the Volume Down and the Power (Wake/Sleep) keys simultaneously.
Step 2. Hold both the keys for another 10 seconds.
Step 3. As the phone would vibrate and restarts, let go of the keys.
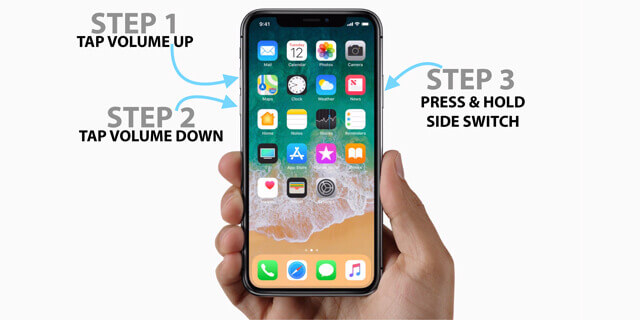
For iPhone 8 and later models
Step 1. Firstly, quick-press the Volume Up key and let go instantly.
Step 2. Without any ado, quick-press the Volume Down button and release the key.
Step 3. Subsequently, hold the Side key for another 10 seconds or so. Make sure that these three steps should be followed without any gap in between.
Step 4. Let go of the Side key when the Apple logo would appear on the screen.
Part 2: Better iTunes Alternative to fix iPhone: dr.fone - Repair (iOS)
If none of the above-listed solutions can fix the iPhone black screen won’t turn on, then don’t worry. You can take the assistance of a dedicated iOS system repair application to fix this problem. Developed by Wondershare, dr.fone - Repair (iOS) provides fast and reliable solutions to repair all kinds of issues related to popular iOS devices. Some common problems that it can fix are the black screen of death, device stuck in the boot loop, bricked phone, and so on.
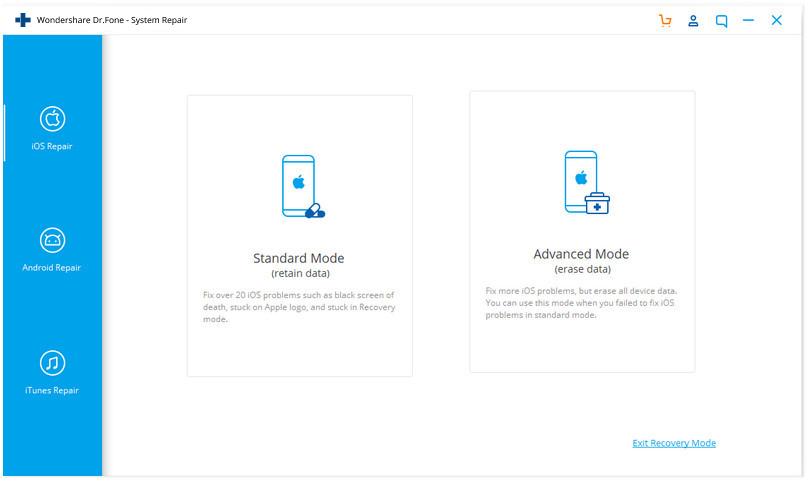
There are two different modes that the application supports – standard and advanced. Ideally, standard mode can fix all kinds of major iOS issues including iPhone screen not turning on. The standard mode will retain all the existing data on the device while the advanced mode will erase it. Here’s how you can fix iPhone 5/6/7/8/X/XS screen is black but phone is on using dr.fone - Repair (iOS).
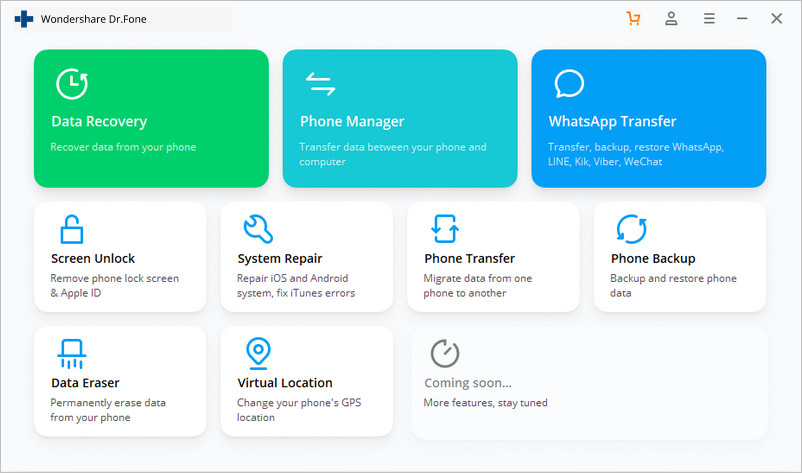
Step 1. To start with, connect your iPhone to your Mac or Windows PC using a working cable. Also, launch the dr.fone toolkit on it and go to the “Repair” module from its home.
Step 2. Under the iOS Repair feature, you will get an option to enter the standard or the advanced mode. If you don’t want to undergo any data loss, then pick the standard mode at first.
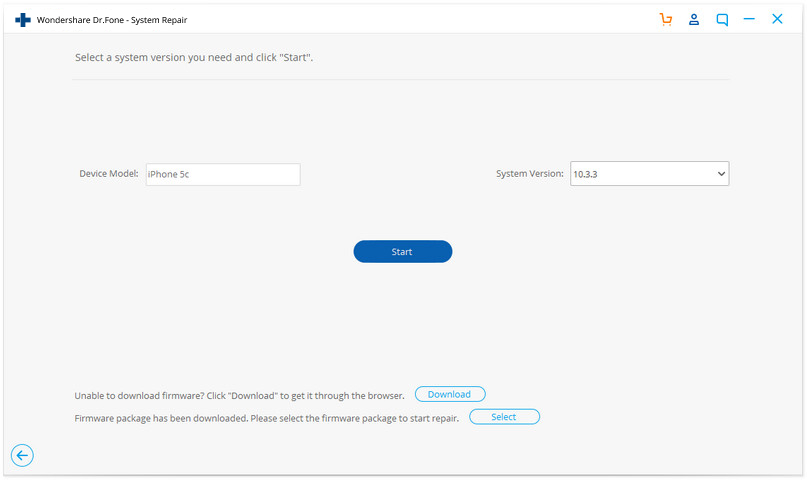
Step 3. The application would automatically detect your device and will display its model and the compatible iOS version. Simply confirm it and click on the “Start” button.
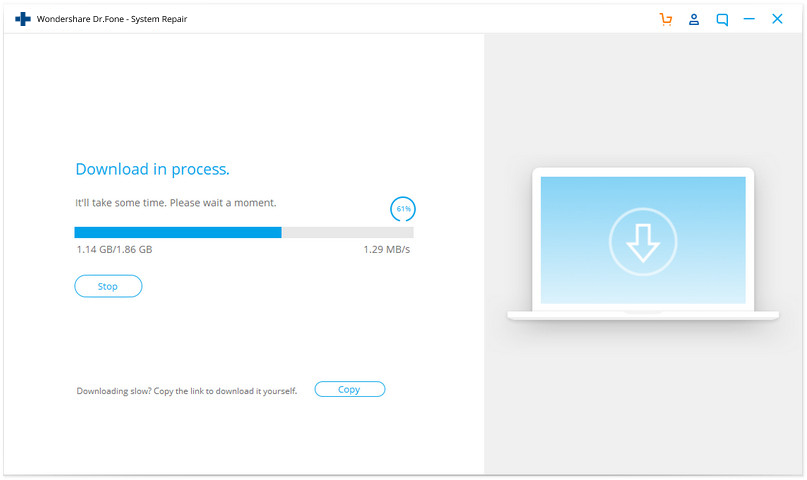
Step 4. This will make the application download the relevant firmware update for your iPhone model. Make sure that you maintain a stable internet connection during the process and don’t disconnect the device in between.
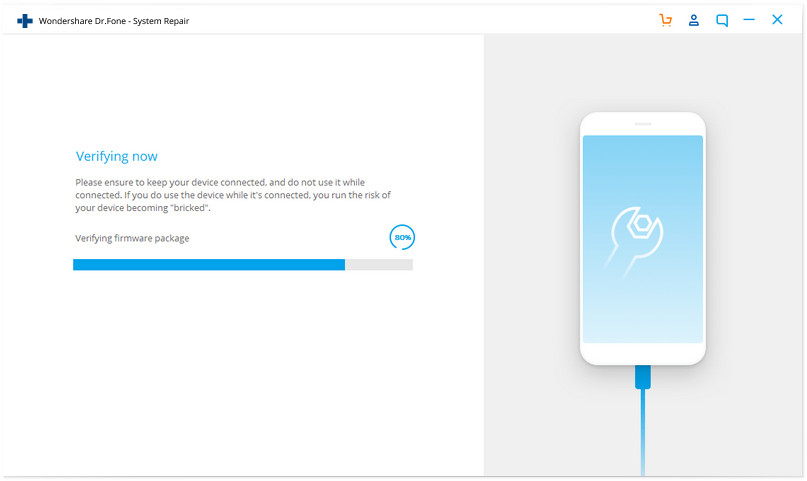
Step 5. Once the download is complete, the tool will verify your device to make sure the firmware version would be compatible with your phone.
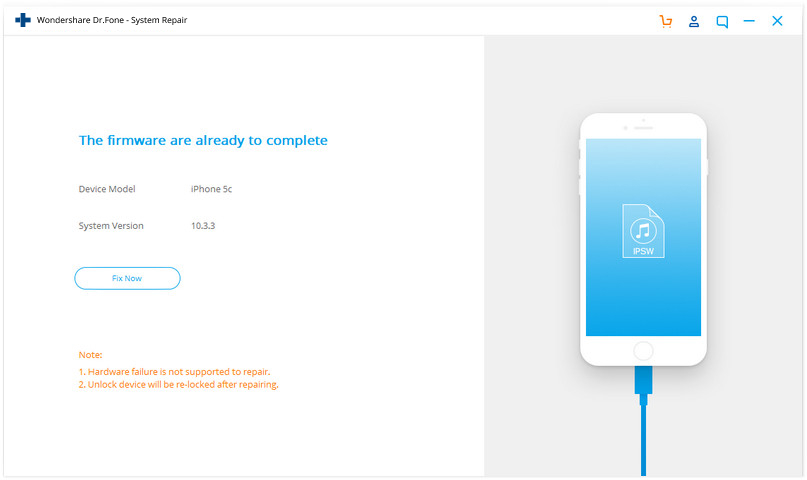
Step 6. If everything goes well, you will get the following screen. All you got to do is click on the “Fix Now” button to resolve the iPhone X screen won’t turn on issue.
Step 7. Wait for a while as your device would be fixed and restarted in the normal mode in the end. You can just safely remove it and use your phone the way you like.

In case if this is not able to fix your iPhone, then you can choose the advanced mode instead to get better results.
Part 3: Get the Device Checked for Hardware Problems in Apple Store
By now, you must be able to fix your iPhone screen not turning on problem. If these software-related solutions won’t do the trick, then chances are that there could be an issue with your device’s hardware instead. For instance, its battery, display, or a vital chip could be physically damaged. To get it resolved, you can just visit the official Apple care nearby. You can go to the official website of Apple support and locate the nearest support center in your location. In this way, you can get one-on-one support from a trained Apple professional regarding your device’s glitch.
That’s a wrap, everyone! I’m sure that this guide on fixing iPhone 5/6/7/8/X screen is black but phone is on must have helped you a lot. Since solutions like DFU or Recovery mode will wipe your device storage, consider trying dr.fone - Repair (iOS) instead. A highly professional tool, it is trusted by the leading experts and can fix all kinds of iOS related issues without causing data loss on your device. Go ahead and give this trusted application a try and share this solution to fix iPhone screen not turning on problem with others as well.
