- Add songs to iPhone without iTunes syncing on Mac or PC;
- Transfer any song to any iPhone on any computer wihtout iTunes.
- Import playlists in iTunes Library to iPhone without iTunes syncing.
- Copy songs in multiple formats to iPhone without incompatibility issues.
- Make any photos or video from Apple devices or PC to GIF images.
- Delete photos/videos by batch with a single click.
- De-duplicate the repeated contacts.
- Selectively transfer exclusive files.
- Fix & optimize ID3 tags,covers,song information
- Directly transfer music, videos, contacts and photos between Apple devices.
- Perfectly backup/restore iTunes library.
- Be compatible with all iOS devices, including iPhone 6S, iPhone 6, iPad Air, iPad mini etc.
- No iTunes needed
- Fully compatible with iOS 11
iPhone Music Manager & Transfer: Export/Import/Delete Music on iPhone
With a huge collection of music files on your iPhone, it becomes extremely necessary to manage them so that you do not have to struggle while searching one of your favorite songs. While managing music on iPhone, you may need to export some of the files to other devices which are less frequently needed, import a few and delete the others which are no longer used. Thus music management and music transfer are very essential to keep your iPhone managed and updated with the latest music files. The most popular and the old school way of managing music transfer on iPhone is using iTunes, but owing to its set of limitations, third party software also proves to be a good alternative. The best and most relevant solutions are listed below if you are looking for the ways for iPhone music transfer and iPhone music manager.
- Part 1. iPhone Music Manger & Transfer: Export/Import/Delete/Fix Music on iPhone without iTunes
- Part 2. iPhone Music Manger & Transfer: Export/Import/Delete Music on iPhone with iTunes
Part 1. iPhone Music Manger & Transfer: Export/Import/Delete/Fix Music on iPhone without iTunes
Although iTunes is widely used to manage music on iPhone. Launch iTunes and sync music to iPhone, it sounds easy. But, really? Each time you use iTunes to sync music, the previous music files on your iPhone will disappear. Besides, if you want to transfer music from iPhone to iTunes, you have to find another way. What if you lost iTunes library and all music files are only trapped on your iPhone?
In this case, you can try the phone manager - Wondershare TunesGo, which is amazing software that works as a complete iOS manager and allows managing music, videos and other contents on your iOS devices. Using TunesGo, you can flawlessly manage your music by importing, exporting, and deleting music on iPhone and other devices. Moreover, the software also allows to transfer contents between iOS & Android devices, PC and iTunes. Other features of the software are listed below:
Manage iOS Devices Easily & Effortlessly - iPhone Transfer
Steps to Export/Import/Delete/Fix Music on iPhone with TunesGo
Step 1 Launch TunesGo and connect iPhone.
Download, install and then launch TunesGo on your PC/Mac. Using a USB cable, connect your iPhone with the PC and the phone will be detected by the software.
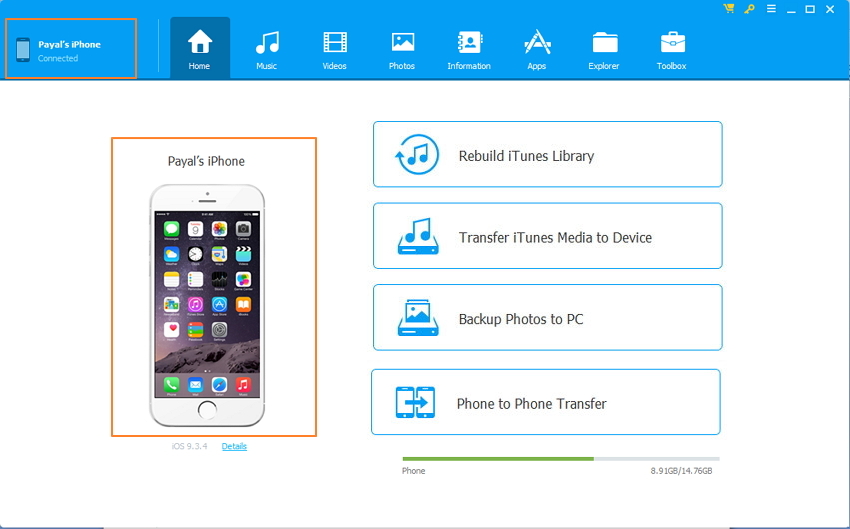
Step 2 Select Music.
Under the connected iPhone, tap on Music option at the top of the main interface, you will enter the Music window by default; if not, click Music at the left sidebar. The list of songs present on your iPhone will be shown.

1. Export Music on iPhone
Listed below are the steps for iPhone music transfer.
Step 3 Select and Export Music to PC.
From the given list of songs, select the ones that you wish to export. Now on the top menu bar, select the option of “Export” and then tap on “Export to My computer” from the drop down list.
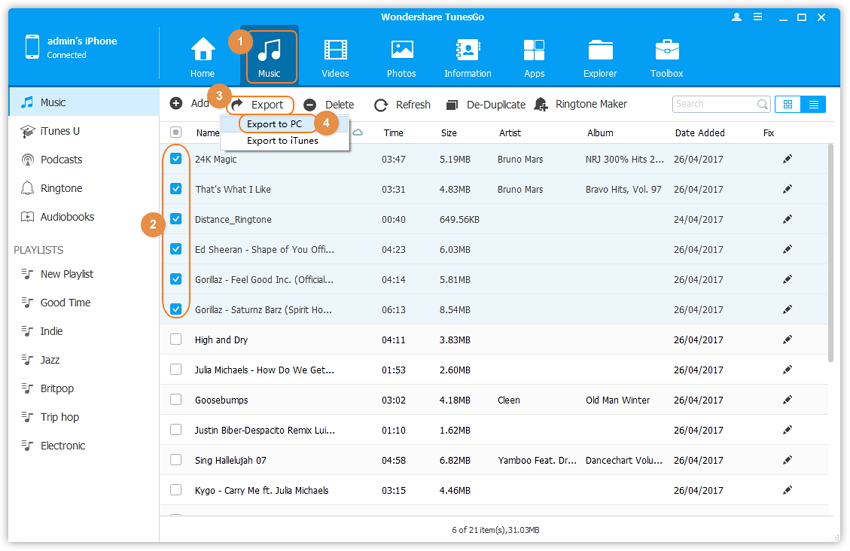
Next select the folder on your PC where you wish to export the songs and then tap on “OK”. Then this iPhone music transfer to PC will be completed.
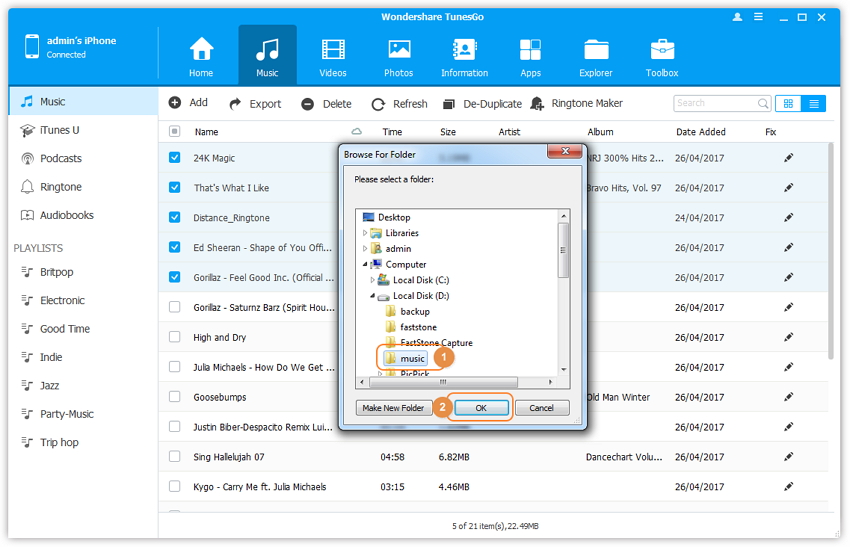
Besides iPhone music transfer to PC, TunesGo also allows to export files to iTunes library as well as other connected iOS devices. For this, tap on “Export” option from top menu bar and from drop down menu, select iTunes or other connected iOS devices. With this, TunesGo proves to be a complete iPhone music manager.

2. Import Music on iPhone
Step 3 Add file or folder
On the top menu bar, tap on “Add” and from drop down menu, select option from “Add file” or “Add folder”. If you only want to select some music files in one folder, then click Add File, and then hold down Shift or Ctrl key to choose multiple files; if you want to tranfer all the music in one folder, then click Add Folder.
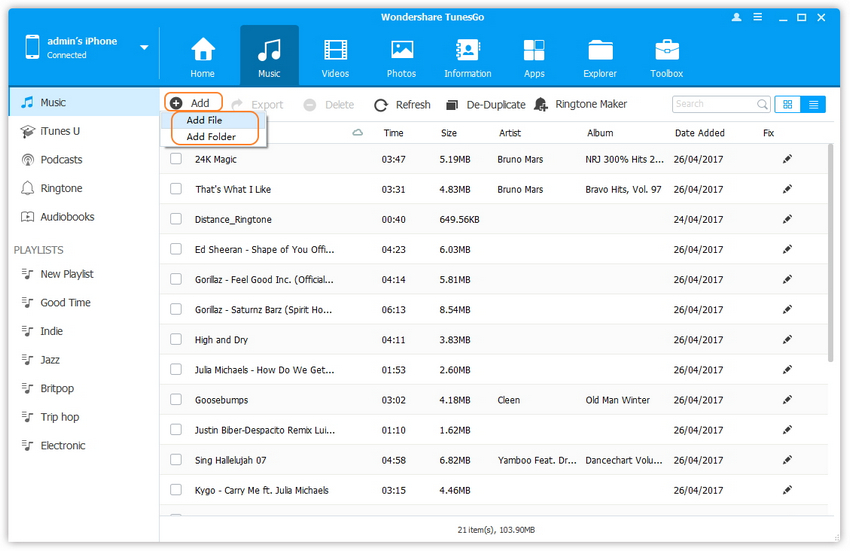
Next browse the folder and select the music files on your PC which you wish to import and then tap on “Open”.
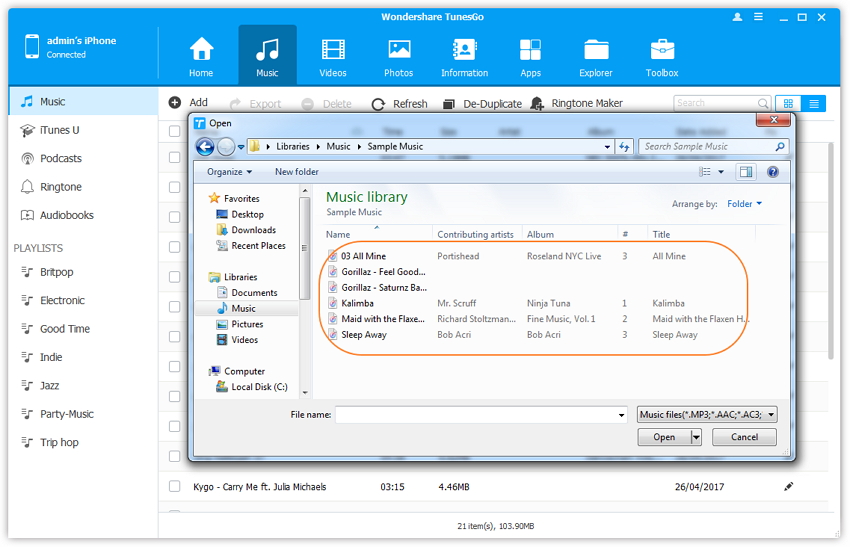
The selected music files will be added to your iPhone.
3. Delete Music on iPhone
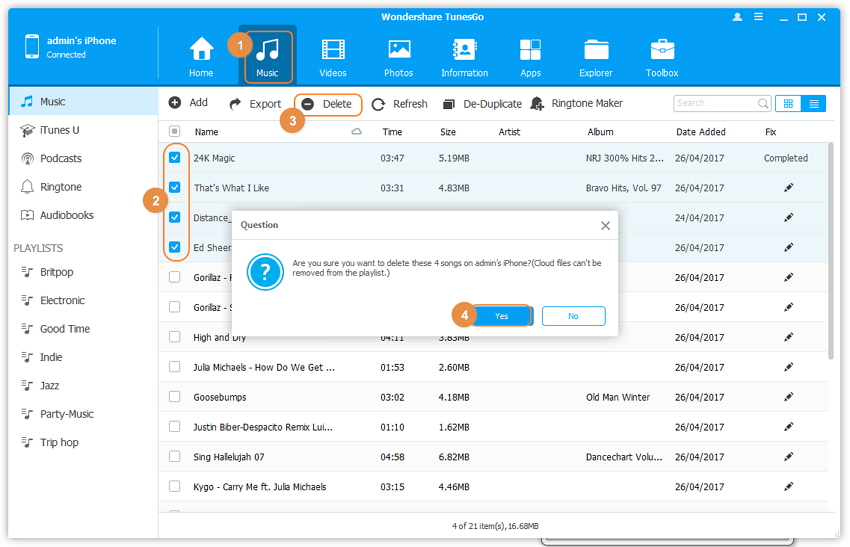
Step 3 Select and delete songs.
From the given list of songs on your iPhone, select the ones that you wish to delete. Next, tap on “Delete” option from top menu bar.
A message will appear to confirm. Press “Yes” to delete the music files from iPhone.
4. Fix ID3 Tags of Music on iPhone
Step 3 Select and fix songs.
From the given list of songs on your iPhone, select the ones that you wish to fix ID3 tags. Next, right-click on the selected songs and select "Fix Music Info” option from the drop down list. Then, click "Yes" from the pop-up confirmation window, TunesGo will start fixing ID3 tags, after the songs have been fixed, click "Yes" to save the update.

Thus considering the above features and functions, TunesGo can be considered as a great iPhone music manager.
Part 2. iPhone Music Manger & Transfer: Export/Import/Delete Music on iPhone with iTunes
As Apple's official software, some people still are willing to use iTunes to manage iPhone contents. Through iTunes, you can use it to sync music, movies, TV shows, photos, videos and other contents on your iPhone. Thus, iTunes can be considered as the preferred choice of users when it comes to music manager for iPhone. Using iTunes, you can export, import as well as delete music on iPhone and the steps are listed as below.
Steps to Export/Import/Delete Music on iPhone with iTunes
Step 1 Launch iTunes and connect iPhone
Launch iTunes on your PC and then connect your iPhone to the PC using a USB cable. The connected iPhone will appear as an icon in iTunes.

1. Export Music on iPhone
Using iTunes, you can only export the music from your iPhone that is purchased from iTunes Store. The music can be exported and transferred to any PC that is authorized with your Apple ID. The steps for iPhone music transfer are listed below.
Step 2 Transfer Purchases
On the top-left corner click on File > Devices > Transfer Purchases from iPhone.

The music files purchased from iTunes store will be successfully transferred.
2. Import Music on iPhone
To import music on your iPhone, firstly you need to have the music files in iTunes library and then these files can be synced and transferred to iPhone.
Step 2 Adding files from your PC to iTunes library
Click on File > Add File to Library.

Next browse and select the target song(s) on your PC that you wish to add and click on Open. The song(s) will be added to iTunes library.

Step 3 Select songs and transfer to iPhone
Click on My Music on iTunes interface that will display the list of songs present in iTunes library. Select the song that you wish to transfer and drag and drop it to iPhone icon on the left panel.

The song will be successfully imported to your iPhone.
Alternatively, you can also sync iPhone to add the songs. For this, click the iPhone icon and then select Music. Then on the right panel, check the “Sync Music” box and enable option of “Selected playlists, artists, albums, and genres”. Next, select the songs on the basis of playlists and albums, and then click on Apply.


Once synced, click on “Done” to complete the process.
3. Delete Music on iPhone
In order to delete songs from iPhone using iTunes, you firstly need to enable the option to manually manage the music files.
Step 2 Enable option of “Manually manage music and videos”.
Under the connected iPhone, tap on “Summary” and then scroll down to enable option of “Manually manage music and videos” on the right side panel under “Option”. Next click on “Done”.


Step 3 Select and delete songs.
Click on “Music” under “On My Device” and the list of songs present on your iPhone will appear. Select the songs that you wish to delete, right click and tap on “Delete” option.

A message will appear to confirm if you wish to delete the song. Click on “Delete” and the selected song will be deleted from your iPhone.
Thus, with the above features, we can conclude that iTunes is a decent music manager iPhone.
Thus if you are looking for a decent music manager for iPhone, one of the two options given above can be considered, depending upon your requirements. If you're not a technical person and want to save your time, you'd better choose TunesGo as your music manager.

