Manage Photos on iPhone: Add/Export/Import/Delete Photos
Besides calling and texting, another most common function of smartphone these days is taking pictures. And when it comes to iPhone, this function becomes even more prominent because of high quality camera of the device. So if you have an iPhone, you are sure to capture lots and lots of pictures and videos. Over the time, the number of pictures keeps increasing and this makes your album messy and unorganized. So to keep your album organized, you need to delete a few unnecessary ones, export some to your PC or other device and add/import a few photos from PC. So now when you know that you need to manage photos on iPhone, the next question is how to manage photos. Below given article will provide the most relevant and the best solutions on how to manage photos on iPhone.
- Part 1. Manage Photos on iPhone with TunesGo
- Part 2. How to Manage Photos on iPhone with Built-in Apps
- Part 3. Conclusion
Part 1. Manage Photos on iPhone with TunesGo
The best way to manage photos on iPhone is by taking help of some software that can match up to all your requirements. Though there are a large number of programs available, if you are looking for the one that is simple as well as quick, then TunesGo is an apt choice. This software from Wondershare acts as a complete iOS manager and allows to transfer not only photos but also videos, music, playlists and other content between iOS devices, iTunes and PC. Moreover, the software also allows taking back-up and restoring them when needed. Using Wondershare TunesGo, you can effortlessly add, export, import and delete photos from your iPhone. The software is compatible with Windows as well as Mac system. So using it, you can also manage iPhone photos on Mac . So if you are looking for solution on how to manage iPhone photos, read below.
Wondershare TunesGo - Phone Manager

- Directly transfer photos, music, videos and contacts between Apple devices.
- Transfer photos, audio and video from iDevice to iTunes and PC.
- Make any photos or video from Apple devices or PC to GIF images
- Import and convert music and video to iDevice friendly formats.
- Delete photos/videos by batch with a single click.
- De-duplicate the repeated contacts
- Selectively transfer exclusive files
- Fix & optimize ID3 tags,covers,song information
- Export & Backup text messages, MMS & iMessages
- Import & Export contacts from major address books
- Transfer music, photos without iTunes restrictions
- Perfectly backup/restore iTunes library.
- Be compatible with all iOS devices, including iPhone 7 Plus, iPhone 7, iPad Air, iPad mini etc.
- Fully compatible with iOS 11
Steps to Manage Photos on iPhone with TunesGo
The steps to manage photos on iPhone using Wondershare TunesGo are listed below.
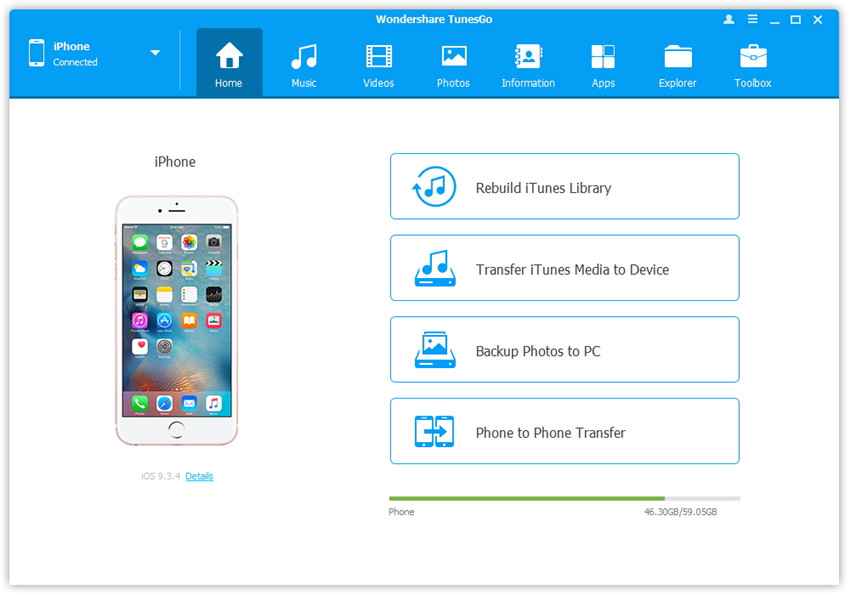
Step 1 Launch TunesGo and connect iPhone with PC
First of all, download, install and launch TunesGo on your PC. Next using a USB cable, connect iPhone to PC and the device will be detected by the software immediately.
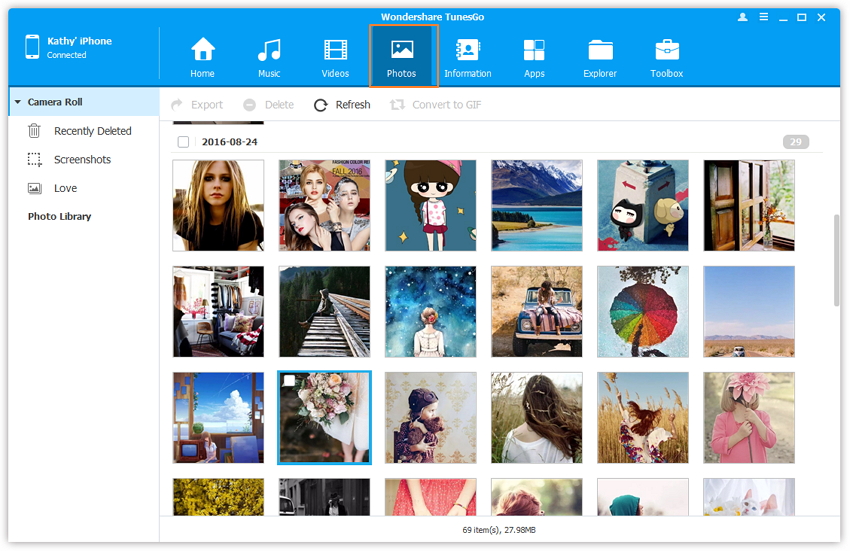
Step 2 Select Photos option under device
Now under the connected iPhone, tap on “Photos” option that will show the list of albums and the number of photos in them.
1. Manage Photos on iPhone: Add/Import Photos to iPhone from PC
In order to add/import photos from PC to iPhone, select the album to which you wish to add the photos. On top menu bar, click the triangle under “Add” button, and select "Add File" or "Add Folder" from the drop down menu.
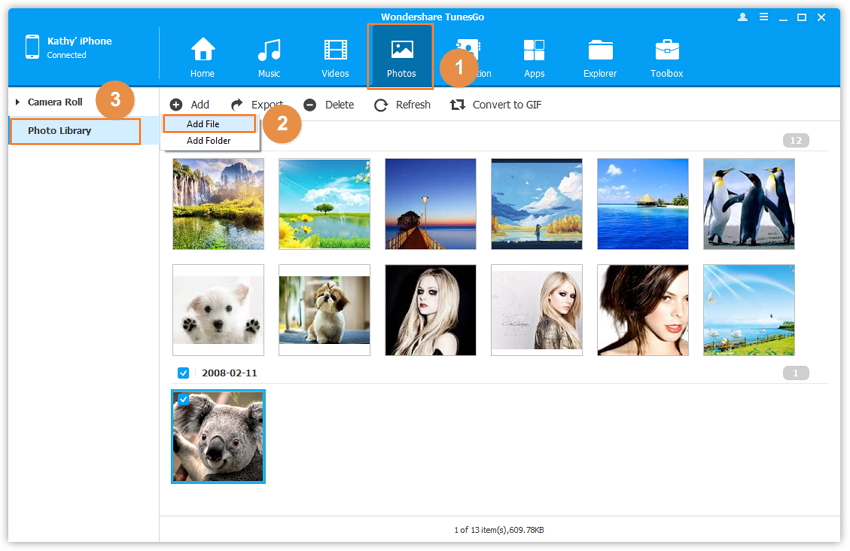
Now select the folder on PC and the desired images that you wish to add and then click on "Open".

2. Manage Photos on iPhone: Export iPhone Photos to PC
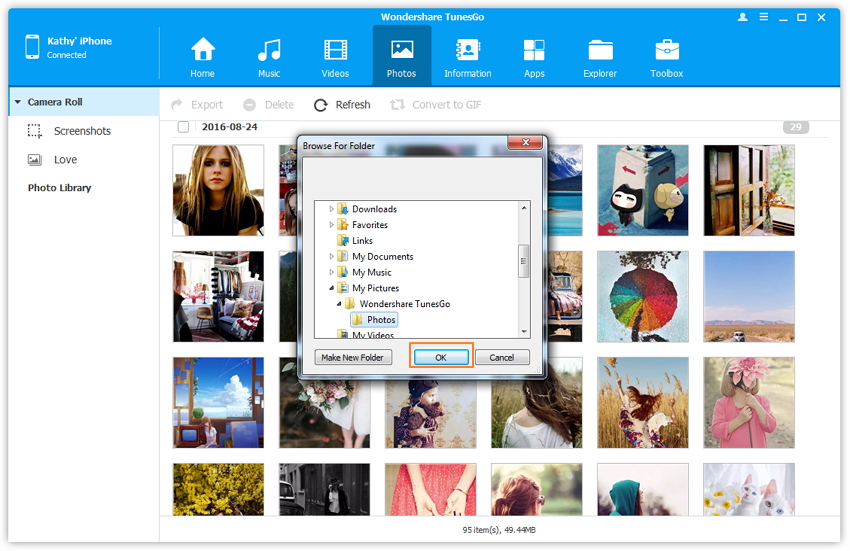
To export photos to PC, select the album and the desired photos that you wish to transfer to PC. Right click to select "Export to PC".
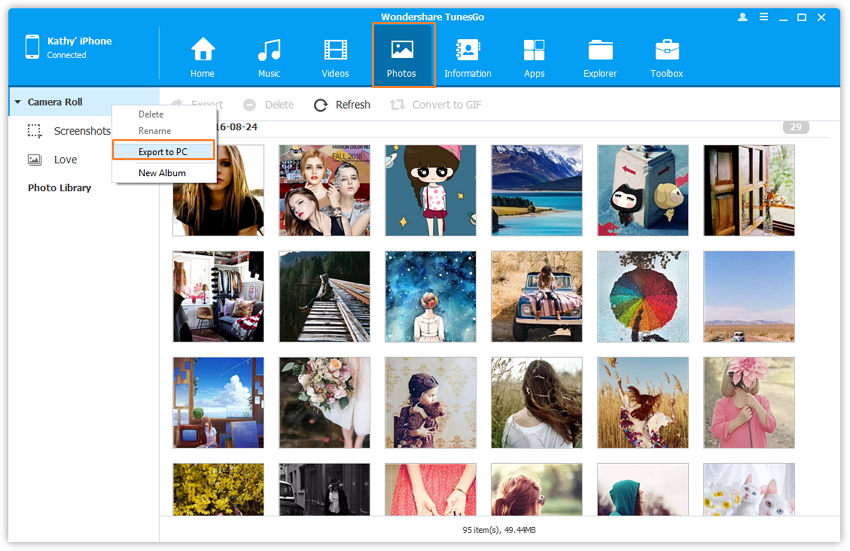
Now select the folder on PC where you wish to export the photos and click on OK. Photos will be successfully added to the selected folder.
3. Manage Photos on iPhone: Export iPhone Photos to other iOS device
To add iPhone photos to other iOS device, first of all, connect the device to PC using a USB cable. Now the new device will also be detected by the software.
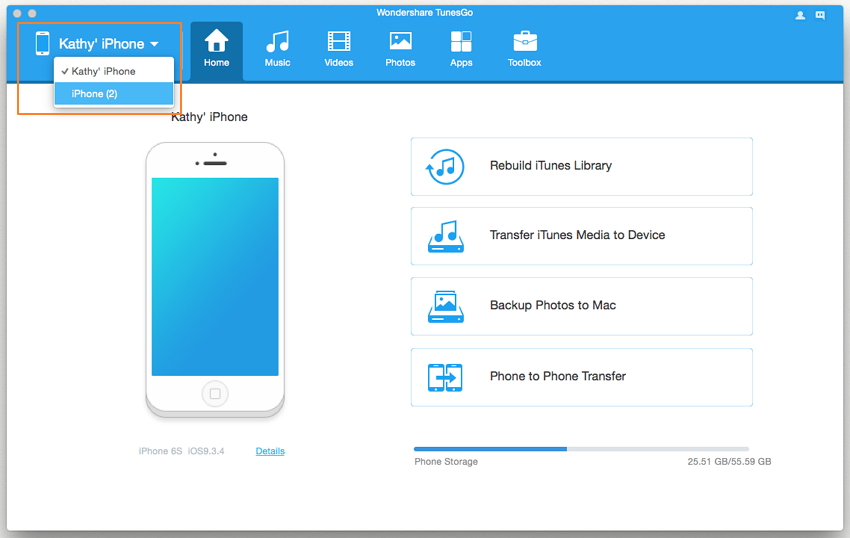
Under iPhone, select album and the photos that you wish to export and then on top main menu, right click to select to “Export to iPhone 2” option-select the other connected device. The selected photos will be transferred to the other connected iOS device.

4. Manage Photos on iPhone: Delete iPhone Photos
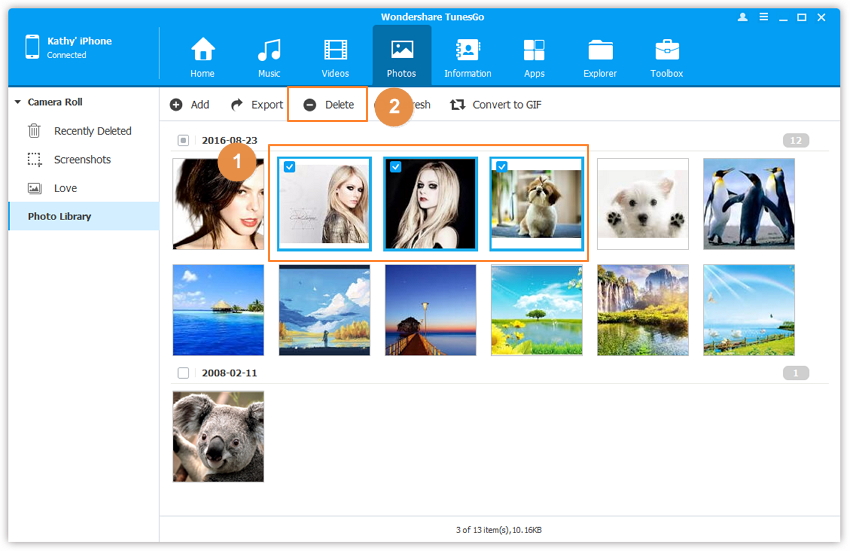
In order to delete the photos on iPhone, select the album and the desires photos. Next click on “Delete” option from top menu bar.
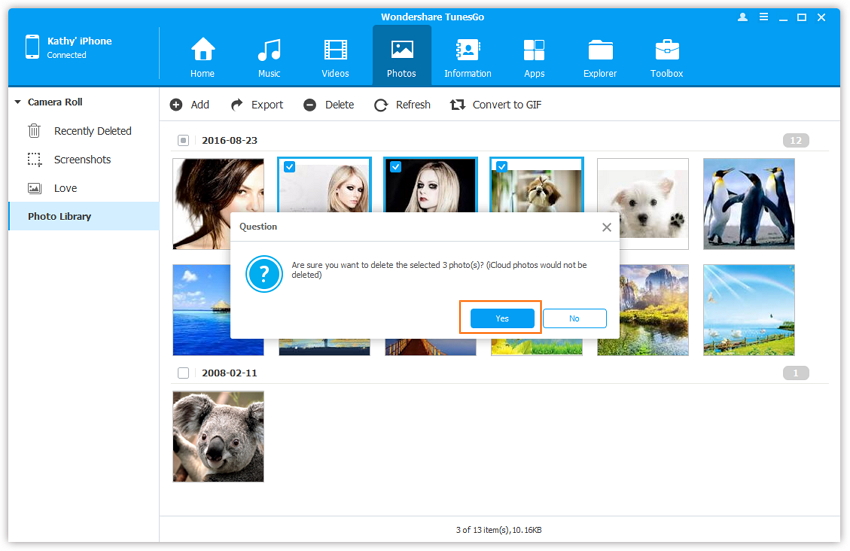
A message will appear to ask you if you are sure to delete the photos. Click "Yes" to delete the selected photos.
Part 2. How to Manage Photos on iPhone with Built-in Apps
Another way to manage photos on iPhone is by using its in-built Photos app. The app enables users to manage photos by transferring them to other albums, deleting the needed one , adding them to favorite and performing other functions. The main album of the Photos app is called All Photos or Camera Roll that stores all the photos as well as videos on the device. The photos which are deleted from Camera Roll will be permanently deleted from the device. There are some other albums on which are automatically created by the OS like Selfies, Slo-mo, Snapseed, Bursts, Screenshots and others. Using Photos app on iPhone, you can manage photos by transferring them from one album to other, deleting them, moving their location within the album.
Steps to mange photos with iPhone's own built-in Photos App
The steps to manage photos with Photos app are listed below.
Step 1 Launch Photos app from home screen of iPhone and the list of albums will appear. This is the basic first step for all of the following operations.


1. Manage Photos on iPhone: Add/Transfer Photos to Album
Step 2 Select the album from where you wish to transfer the photo and tap “Select” at the top-right corner.


Step 3 Now check the photos that you wish to transfer. Next tap “Add to” option on bottom-right corner.

Step 4 From the new window, select the album to which you wish to add the photos.

The selected photos will now be added to the album.

2. Manage Photos on iPhone: Delete Photos from iPhone
Step 2 Select the album from which you wish to delete the photos and then tap “Select” at the top-right corner.


Step 3 Select the photos that you wish to delete and then tap on "Delete" icon on bottom-right corner.

A confirmation message will appear, press “Remove from Album” and the selected photos will be deleted from the album.

3. Manage Photos on iPhone: Change the Order of Photos in iPhone
Using Photos app of iPhone, you can manage iPhone photos by changing the order of the photos. The steps for changing the order are as below.
Step 2 Select the album in which you wish to change the order of the photos and then tap “Select” on the top-right corner.


Step 3 Select the photo that you wish to move and then hold it for a few seconds and then drag it to the new position. Press Done on the top-right corner when you complete the process. The order of the photo will be changed.


Here you need to note that the order of the photos in Camera Roll and the albums which are created automatically by OS cannot be changed.
Besides transferring photos, deleting them and managing them, Photos app also enables users to organize the albums by creating new albums, renaming them , adding photos to them and deleting them.
Part 3. Conclusion
Above two methods for iPhone photo management , you can select either of the methods depending upon your needs and requirements. Both of the methods have some pros and cons associated with them and below given is the list for your further reference.
1. Pros and Cons of Using TunesGo for Managing Photos on iPhone
-
Pros:
- Allows managing photos quickly and easily.
- There are various additional features offered by software like GIF maker and others.
- Allows to transfer photos to PC and then you can manage iPhone photos on PC.
- Allows transferring photos to other iOS devices directly.
-
Cons:
- Needs installation of third party software.
- Does not allow transfer of photos between two albums directly.
2. Pros and Cons of Using In-built Photo App for Managing Photos on iPhone
-
Pros:
- Does not need any installation of third party software.
- Allows to transfer photos between albums.
- Being in-built app, the process is simple and straightforward.
-
Cons:
- Cannot transfer photos to PC directly.
- Cannot transfer photos to other iOS devices directly.
- Does not come with any additional features.
