How to Transfer Music from iPhone to iTunes in One Click
“Is there any easy way to manage my music in one place? I’m finding it hard to understand how to transfer music from iPhone to iTunes and vice versa.”
Recently, we have got plenty of feedback like this from our readers regarding a seamless way to manage their music. Even though there are lots of ways to transfer music files from one iOS device to another, it can get a little confusing. To help our readers, we have come up with this quick and informative guide on how to transfer music from iPhone to iTunes. If you are finding it hard to manage your music, then don’t worry. Simply go through this comprehensive post and make your smartphone experience trouble-free.
- Part 1: How to Transfer Music from iPhone to iTunes
- Part 2: How to Transfer Music from iTunes to iPhone
- Video Tutorial: How to Transfer Music from iPhone to iTunes
Wondershare TunesGo: A must-have iPhone Transfer tool
If you wish to manage your data without any hassle, then simply take the assistance of Wondershare TunesGo. It is an essential iPhone transfer tool that can be used to move your data files from one device to another with a single click. A one-stop solution to manage your phone, it provides a fast and extremely secure way to transfer almost every kind of data from your phone to system (and vice versa). Following are some of its key characteristics:
Wondershare TunesGo - iPhone Transfer Tool

- No iTunes needed
- Transfer music, photos without iTunes restrictions
- One-click backup iPhone/iPad/iPod to PC
- Perfectly backup/restore iTunes library
- Transfer between iOS/Android devices directly
- Transfer audio/video from Device to iTunes and PC
- Can backup your data and restore it afterward
- Delete photos/videos by batch with a single click
- Performs a direct phone to phone transfer
- Selectively transfer exclusive files
- Fix optimize ID3 tags,covers,song information
- Fully compatible with iOS 11 (and Android 7.0)
How to Transfer Music from iPhone to iTunes
One of the fastest ways to transfer music from iPhone to iTunes is by using TunesGo iPhone Transfer tool. It provides an easy to use and extremely secure interface that can let you transfer music files from iPhone to iTunes with a single click. With Wondershare TunesGo, you can either manually select the music files you wish to transfer or can rebuild the entire iTunes library as well.
Firstly, learn how to transfer music from iPhone to iTunes using TunesGo transfer tool by following these steps:
Step 1 Download Wondershare TunesGo right here and launch it on your Windows or Mac. Connect your iPhone to the system and let TunesGo recognize it automatically.
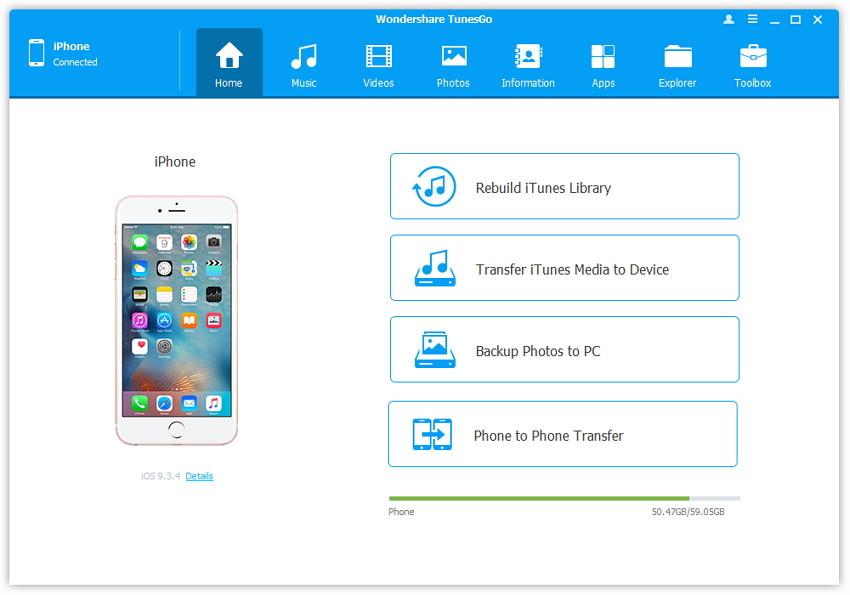
Step 2 Now, select the “Music” tab from the menu bar. This will provide a detailed list of all the audio files that are stored on your phone. Simply select the files that you wish to move to iTunes and click on the “Export” button. Choose the “Export to iTunes” option to move the selected files to iTunes.
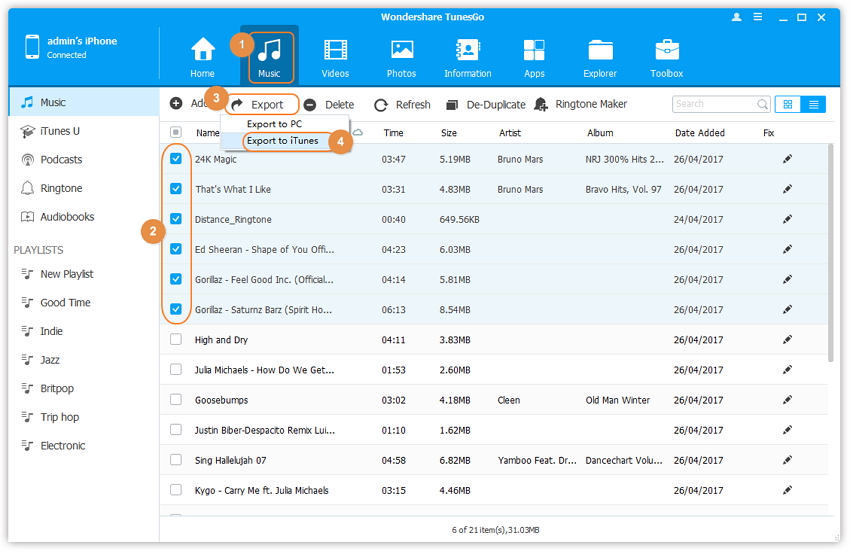
Step 3 As you can see, TunesGo interface provides a segregated view of all the stored audio files. From the left grid, select a preferred category from iTunes U, Podcasts, Ringtones, and Audiobooks. Follow the same drill to move music to iTunes. Simply select the files, click on the “Export” button and select the “Export to iTunes” option.
Step 4 This will commence the transfer process. Make sure that you don’t disconnect your phone during the operation. Once it is done, you will be notified with an on-screen message. Just click on the “Ok” button to exit it.
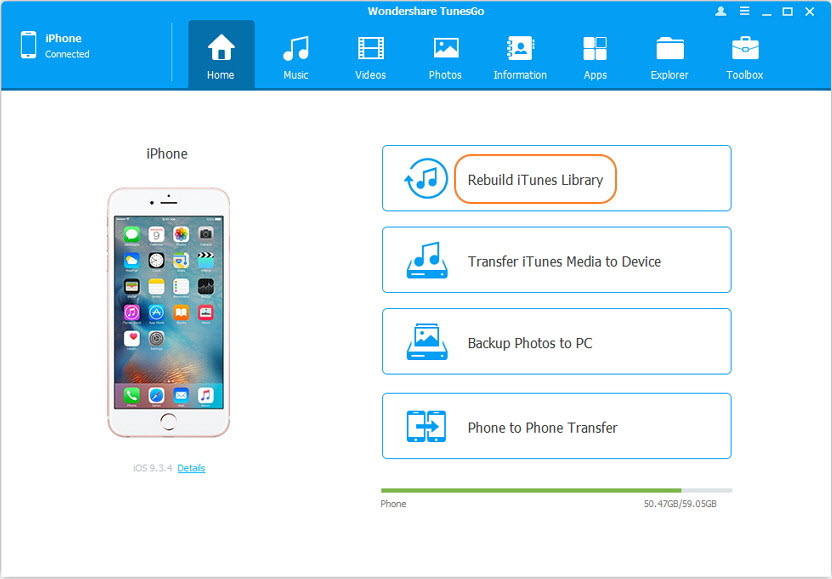
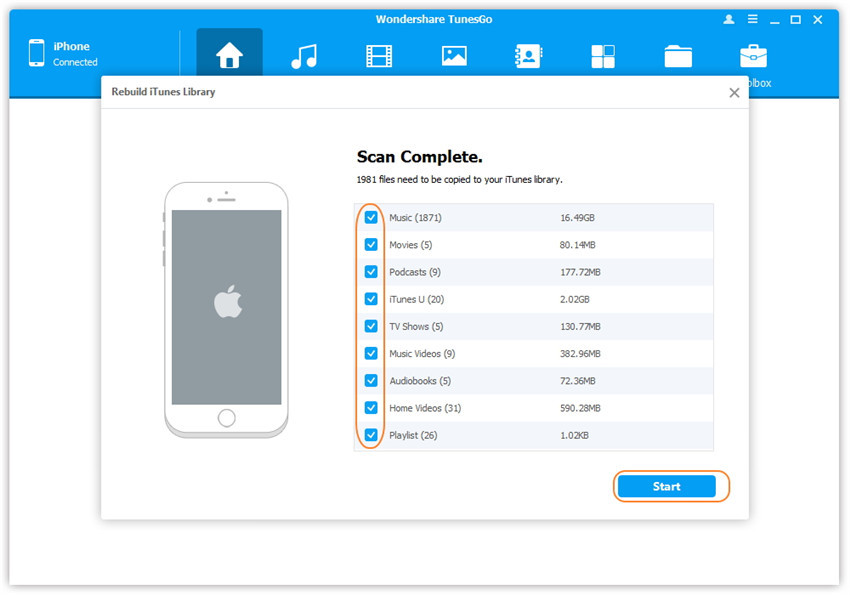
You can also transfer all the data files from iPhone to iTunes in one go with TunesGo. To do this, select the option of “Rebuild iTunes library” from the welcome screen of TunesGo after connecting your device to the system. Wait for a while as TunesGo will sync your phone and provide a list of all the data files it can move to iTunes. Afterward, simply make your selections and click on the “Start” button to rebuild iTunes library.
How to Transfer Music from iTunes to iPhone
After learning how to transfer music from iPhone to iTunes, plenty of users also wish to move their desired music from iTunes to iPhone as well. By doing so, you can manage their entire music library on both, iTunes and iPhone. Fortunately, TunesGo provides a fast and reliable solution to move various data files from iTunes to iPhone as well. It can be achieved by following these steps.
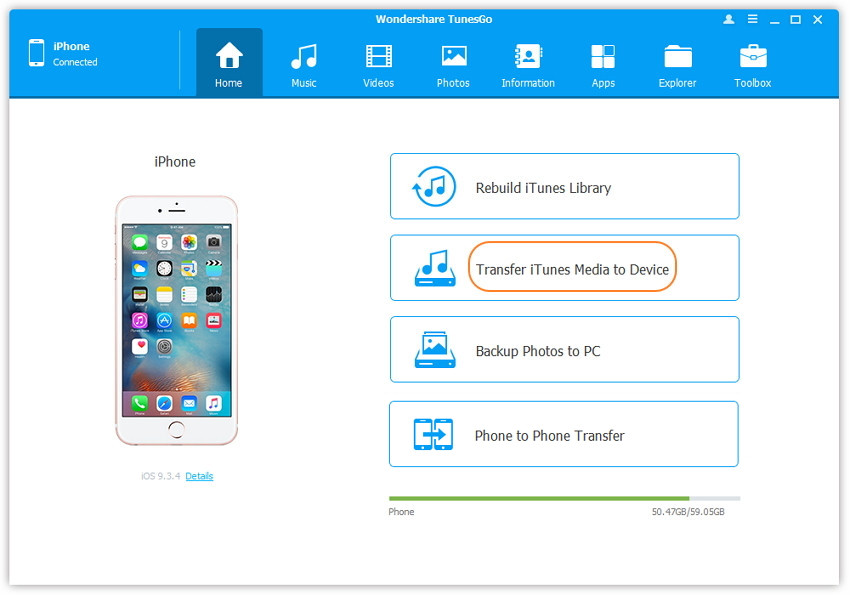
Step 1 Simply connect your iPhone to the system and launch Wondershare TunesGo. From the welcome screen, choose the option of “Transfer iTunes Media to Device” in order to commence.
Step 2 This will launch a new window from where you can select the kind of data you wish to move from iTunes to iPhone. By default, the entire library would be selected.
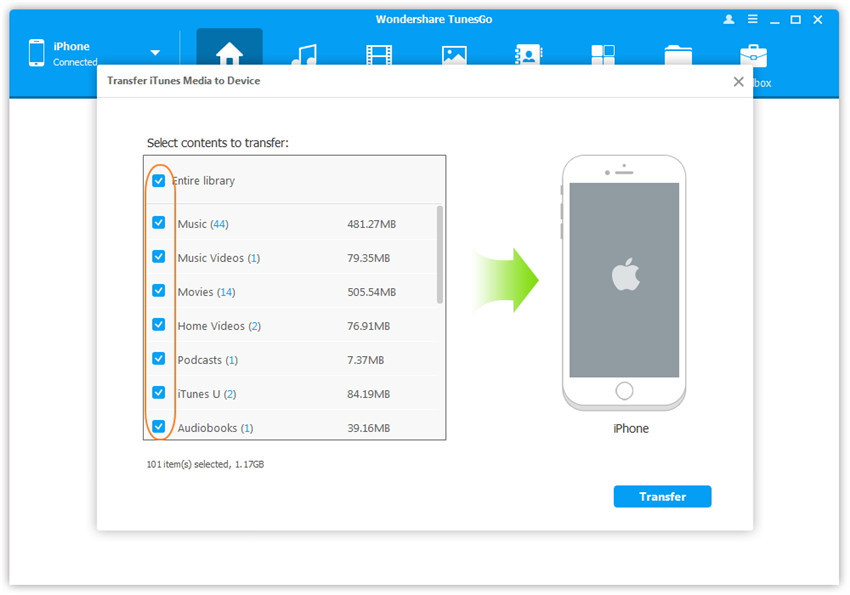
Step 3 You can also handpick the type of data files you wish to move as well. Once you are done, click on the “Transfer” button to initiate the process.
Step 4 Wait for a while as TunesGo will move your data files from iTunes to iPhone. As soon as it is completed successfully, you will be notified. Just click on the “Ok” button to exit the interface.
Furthermore, don’t worry about having duplicate files on your phone while transferring your content. TunesGo automatically detects duplicate files and provides an optimized way to transfer your data from iTunes to iPhone.
Video Tutorial: How to Transfer Music from iPhone to iTunes
Now when you know how to transfer music from iPhone to iTunes (and vice versa) – you can easily move your important audio files from one device to another in no time. Not just audio files, with TunesGo, you can move various data files like photos, videos, contacts, books, and more in a seamless manner. If you wish to keep your data safe, handy, and easily available, then you should definitely give TunesGo a try. Download it on your system right away and make your life a whole lot easier.
If this guide helps, don't forget to share it with your friends.
