How to Root Amazon Kindle Paperwhite

A lot of devices nowadays are already being manufactured and sold to the public. These devices offer entertainment to the users. For example, through these devices, the individuals will be able to listen to their favorite music, read online books, access the Internet, and even communicate with other people over the Web. One of these devices would be the Amazon Kindle Paperwhite. Amazon has place several security restrictions on their devices so that hacks can be prevented since these hacks can compromise the safety as well as the security of the users. With the presence of these security restrictions, the individuals can only download and install applications that are supported by or associated with Amazon, such as those that are found in the Kindle Store.
However, there are other individuals who also wish to include third party applications. These applications may be interesting for them or they find these apps very useful. Third party applications are not supported by Amazon so the users may find it disappointing. In this case, rooting the Amazon Kindle Paperwhite would be the solution. When rooting such device, you will be removing these restrictions yet it will not be affecting the standard functionality of the device. You have to take note, though, that rooting the device can get your warranty with Amazon voided. The following are the steps involved on how to root Amazon Kindle Paperwhite.
How to Root Amazon Kindle Paperwhite
Step 1: First, you will have to prepare all of the items that you will be needing for the process. You need to prepare your Kindle Paperwhite. You should make sure that it is fully charged or has a remaining battery life of at least 50% so that it will not shut down while the rooting process takes place. If the device turns off during the process, it may result to irreversible damages instead. You should also get a hold of a USB connector or sync cable and a personal computer or laptop. These two items will be used for transferring files later on.
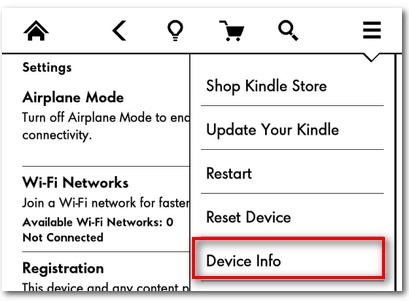
Step 2: You have to check the OS version of the Kindle Paperwhite that you have. To be able to root the device, its OS version should either be 5.3.0, 5.3.1, 5.3.4 or 5.3.5. If the OS version that you have is 5.3.3, you would need to upgrade it to the 5.3.5 version. If you have the OS version 5.3.6+, then, you would need to downgrade it to 5.3.5. in order to check the current OS version of your device, you need to tap the Menu button and then select Settings. In the Settings page, you should tap on Menu and select Device Info. This page will let you know what OS version your device currently has.
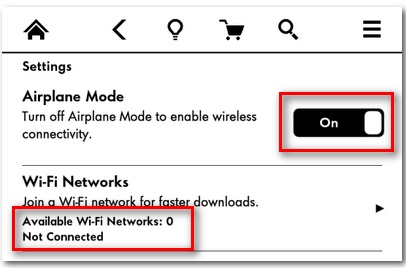
Step 3: If your current OS version needs to either be upgraded or downgraded, you will need to download the upgrade or downgrade files from the Amazon server websites. In case these main servers do not work, you may also opt to download the files from a third party website such as one from the developer lxtab. You will be needing your personal computer at this point. Before you proceed with this step, though, you have to make sure that the Kindle Paperwhite will be set to “Airplane Mode”. This way, you can prevent the device from connecting to the Amazon servers and also prevent it from attempting an over-air upgrade. Any type of interference can also be avoided. To do so, you just need to tap on the Menu button on your Kindle Paperwhite and select Settings. Afterwards, you just toggle the button on the “Airplane Mode” section to Off.
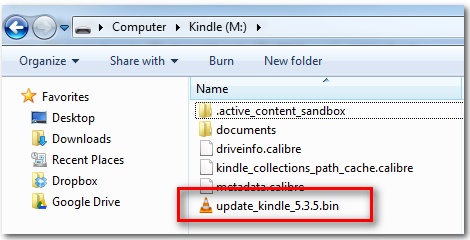
Step 4: After the download on your computer has been completed, you should connect your Paperwhite to your computer using the USB sync cable. You need to transfer the downloaded file from the server to your device. Typically, it will be a .bin file.
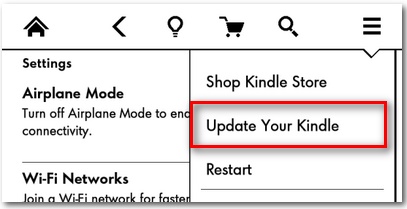
Step 5: After the file has been successfully transferred to your Kindle, you should remove the device from your computer. You should then go to Menu on your Kindle, select Settings, tap on Menu again, and choose Update Your Kindle. The Kindle will reboot by itself and start the update. You will be seeing a progress meter on the screen. It may take 5 to 10 minutes for the update to finish so just leave it be. Afterwards, you should check the Device Info again to ensure that the update has been successful.
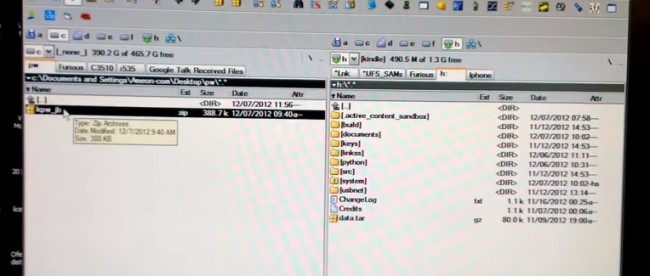
Step 6: Now that you already have the right OS version for your Paperwhite, you will then need to go back to your computer to download the rooting files. The rooting files can be downloaded by clicking on the links that can be found on the website of the server. After completely downloading the kpw_jb.zip files, you should connect your Kindle again to the computer. While the device is connected to the computer, you will need to transfer and unzip the kpw_jb files to your Kindle.
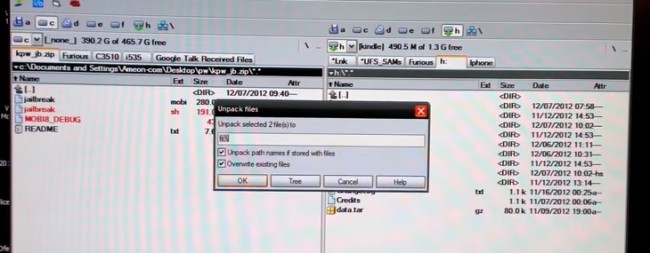
Step 7: While your device is still connected to the computer, you have to click on the very first box that you will be seeing on the screen of your Kindle. Then, you need to click anywhere on the screen to start the process.


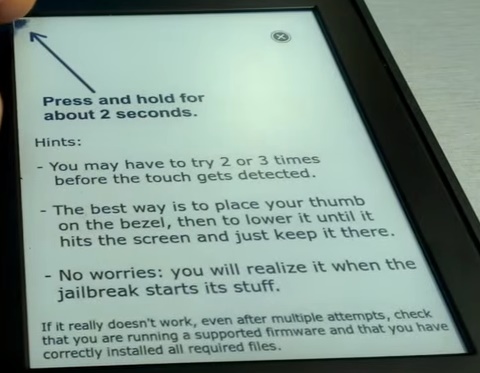
Step 8: Afterwards, you need to follow the instructions that you will be seeing on the screen of your Kindle Paperwhite. The instructions are pretty easy so you do not need to worry.
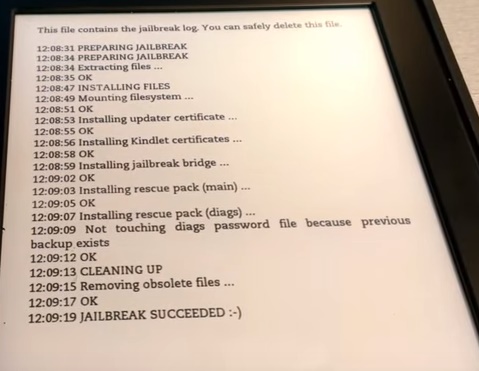
Step 9: The device will be preparing the process. First, it will extract the files and do its magic. All you have to do is wait for the device to finish the process. Typically, the screen will show you the progress of the process that the kindle is going through.

Step 10: Once the rooting process has been successfully completed, the screen will then go back to the page showing you the files that are installed on the device. The rooting file will still be the first file that you can see on the top left box. If you want to check the logs that the device have been through, and to double-check if the process is a success, you can click on the file. It will give you the log of the process.


Root Android - Root your Android Device with One Click
- Backup your music, photos, videos, contacts, SMS etc. to computer and restore them easily.
- Manage, export&import your Contacts and SMS, deduplicate Contacts, reply SMS with computer.
- One-click Root - Root your Android phones/tablets to take full control of your device.
- Phone to Phone Transfer - Transfer music, photos, videos, contacts, SMS between two mobiles (both Android and iPhone are supported).
- App Manager - Install, uninstall, import or backup Apps in batch.
- Gif Maker - Create Gif from photos, motion photos, videos.
- iTunes Manager - Sync iTunes Music to Android or transfer music from Android to iTunes
- Fully compatible with 3000+ Android devices (Android 2.2 - Android 8.0) from Samsung, LG, HTC, Huawei, Motorola, Sony etc.
