How to Transfer Contacts from Note 8 to iPhone
There are different ways to transfer contacts from Android to iPhone. Since plenty of users move from Android to iPhone (and vice-versa), it also led to numerous ways to perform a seamless transfer of data as well. If you have also got a new iPhone and wish to transfer your contacts from Note 8 to iPhone, then you have come to the right place.
After all, the first thing that we think of moving from our old device to a new one is our contacts. In this post, we will make you familiar with four different solutions to do the same. Read on and learn how to transfer contacts from Android to iPhone in different ways.
- Option 1. Transfer Contacts with desktop phone manager
- Option 2. Transfer Contacts from Note 8 to iPhone Via SIM Card
- Option 3. Using Google Account to transfer contacts from Samsung Note 8 to iPhone
The Best Samsung Note 8 Phone Manager
One Stop Solution to Transfer Contacts from Note 8 to iPhone
- Backup your music, photos, videos, contacts, SMS, Apps etc. to computer and restore them easily.
- Manage, export/import your music, photos, videos, contacts, SMS, Apps etc.
- Phone to Phone Transfer - Transfer everything between two mobiles.
- Highlighted features such as 1-click root, gif maker, ringtone maker.
- Fully compatible with 3000+ Android devices (Android 2.2 - Android 8.0) from Samsung, LG, HTC, Huawei, Motorola, Sony etc.
Option 1. Transfer Contacts with desktop phone manager
Wondershare TunesGo is undoubtedly one of the best ways to transfer contacts from Samsung Note 8 to iPhone. A complete phone management tool, it can be used to directly move your data files from one device to another. Not just to perform a direct phone to phone transfer, TunesGo can also be used to manage your device’s data. One can move different data files from their phone to system and vice-versa in a seamless way.
Furthermore, it also comes with plenty of added features like ringtone maker, GIF maker, and more. It can also be used to root an Android device or rebuild an iTunes library on the go. Compatible with almost every leading Android and iOS version, its desktop application is available for both, Windows and Mac. It can be used to transfer contacts from Android to iPhone in one go and also to selectively transfer contacts. We have discussed both of these techniques right here.
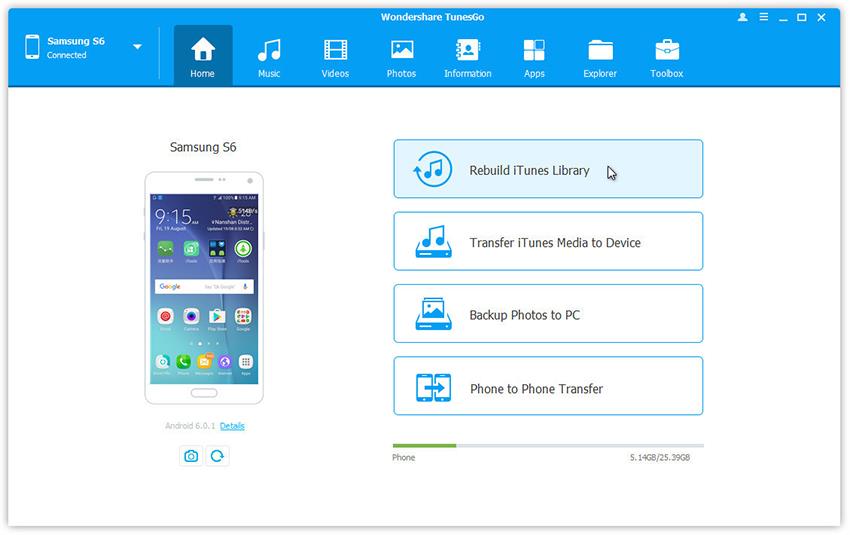
Step 1 Download TunesGo Wondershare on your system and launch it to transfer contacts from Samsung Note 8 to iPhone. Connect both the devices and select your source device to start with. Click on the “Phone to Phone Transfer” option on the welcome screen.
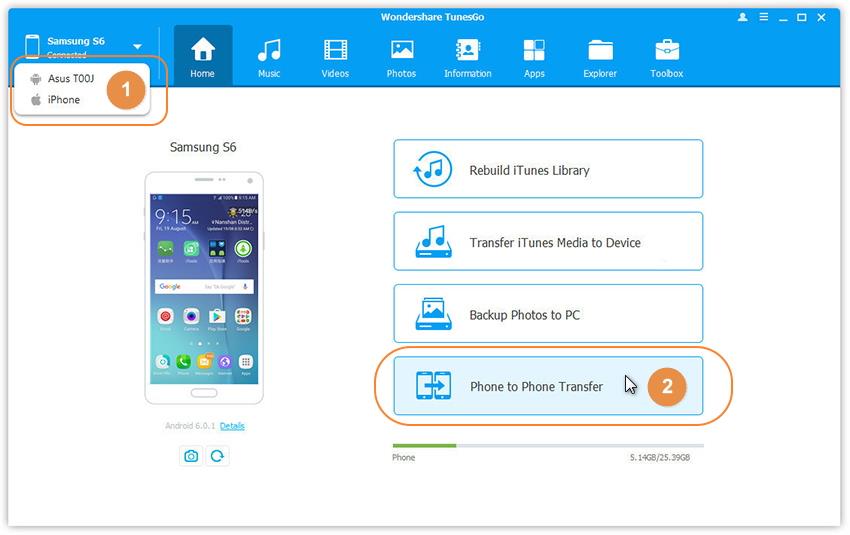
Step 2 In the next window, select your target device (iPhone) from a dropdown list. Click on the “Next” button after making your selection.
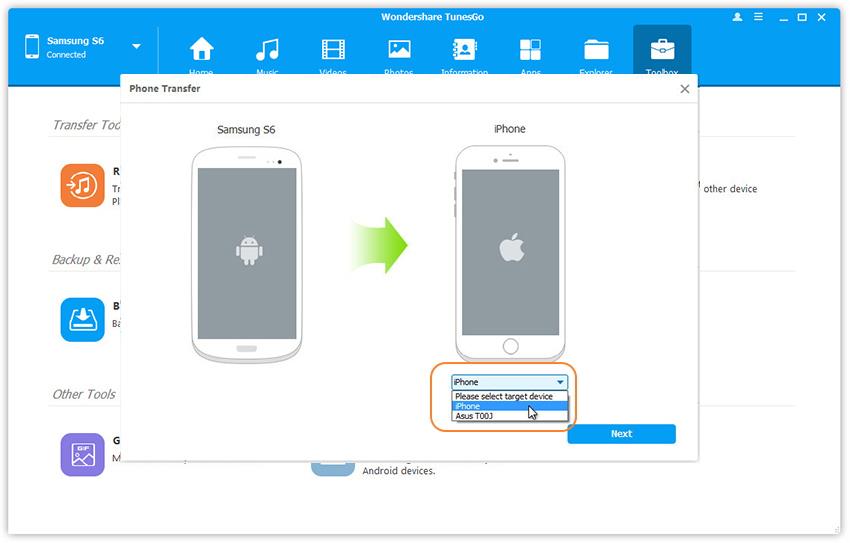
Step 3 From the next window, you can select the type of data files you wish to transfer. Make sure that you select the “Contacts” option before clicking on the “Transfer” button.
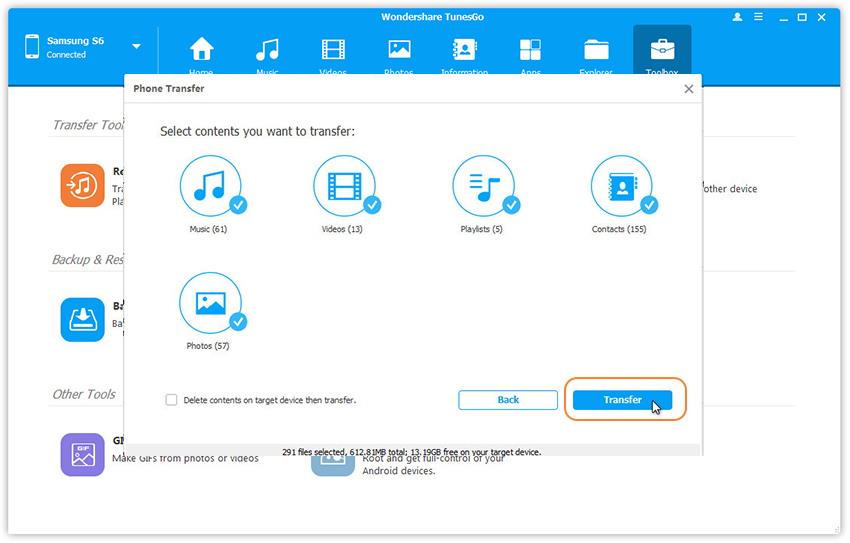
This will initiate the transfer process. Don’t disconnect your devices as TunesGo will complete the transfer process.
Selectively transfer contacts from Android to iPhone
Step 1Launch TunesGo and connect both the devices to the system. Select the source device from the top-left dropdown list and click on the “Information” tab.
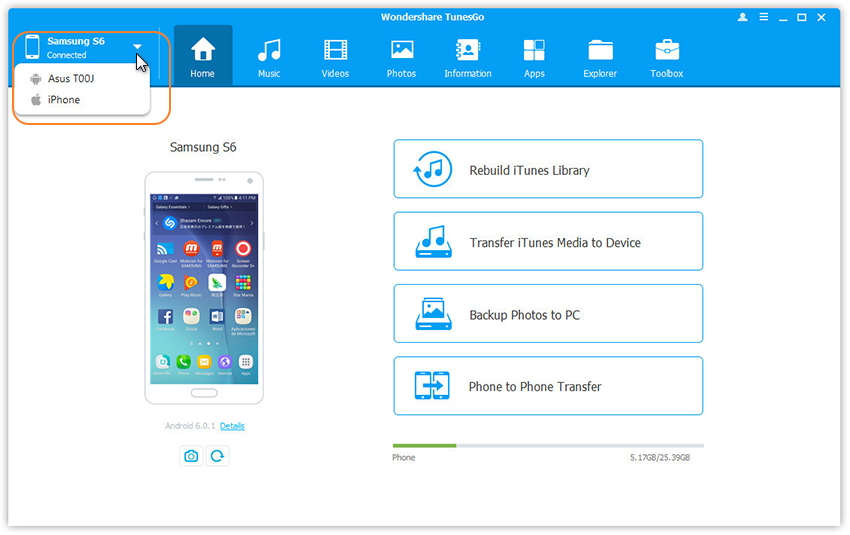
Step 2From here, you can select the contacts you wish to move. After manually selecting the contacts, click on Export > To Device option and choose your target device.
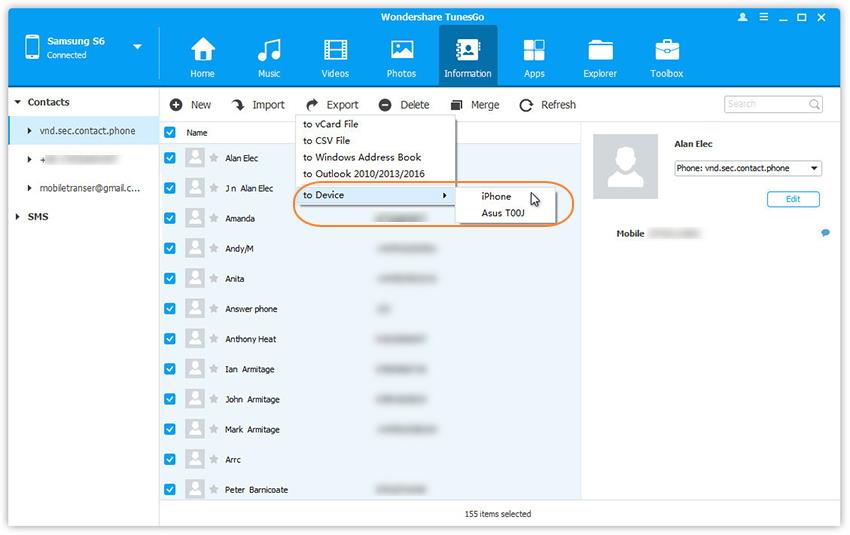
Wait for a while as it will move your selected contacts to your target device (iPhone). After following these steps, you would be able to learn how to transfer contacts from Android to iPhone.
Option 2. Transfer Contacts from Note 8 to iPhone Via SIM Card
If you don’t have lots of contacts on your phone, then you can also manually transfer them to your SIM card. Later, you can use the same SIM card on your iPhone and import these contacts. Learn how to transfer contacts from Android to iPhone using SIM card by following these steps:
Step 1Go to your Android device’s Contacts > Settings and choose the option of “Import/Export contacts”. From here, tap on the option of “Export to SIM card”.
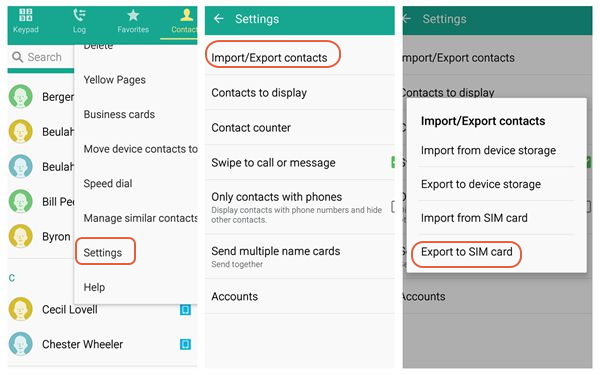
Step 2 Now, eject this SIM card from your Android phone and insert it into your iPhone.
Step 3 Go to iPhone Settings > Mail, Contacts, Calendar tab and select the option of “Import SIM Contacts”.
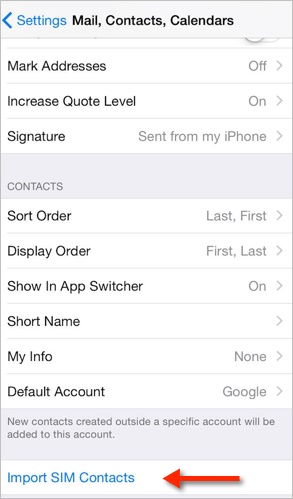
This will import your contacts from the SIM card to your phone without the need of any third-party application.
Option 3. Using Google Account to transfer contacts from Samsung Note 8 to iPhone
Since you can access your Google account on both the devices, it can also be used to transfer contacts from Android to iPhone. Ideally, every Android user should sync their contacts with their Gmail account in order to keep their data secure. This technique will let you access your contacts on the go via your Google Account. To learn how to transfer contacts from Android to iPhone via Gmail account, follow these instructions.
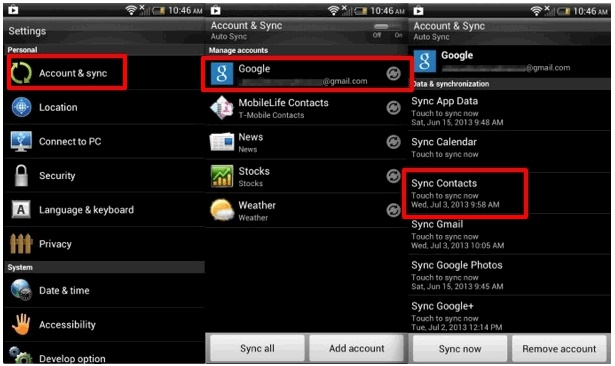
Step 1To start with, sync the contacts on your Android phone with your Google account. Visit your device’s Settings > Accounts & Sync and select your Google account.
Step 2 Tap on the option of “Sync Contacts” to copy your contacts on your Google account.
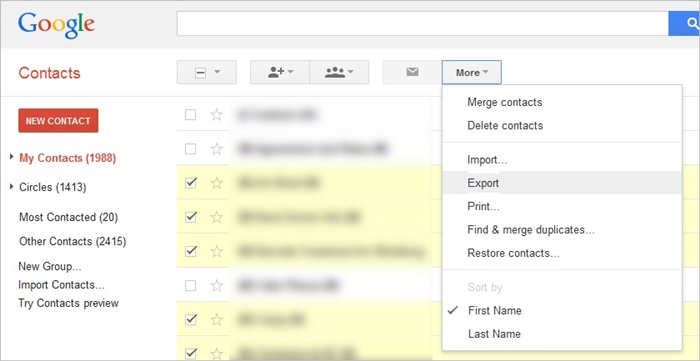
Step 3 Later, you can also visit your Google Contacts to check if your contacts have been synced or not.
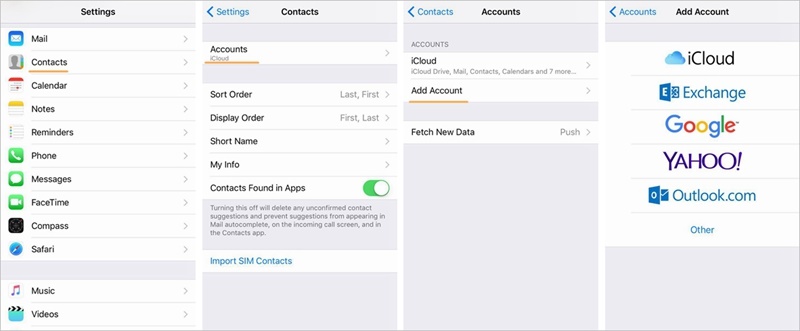
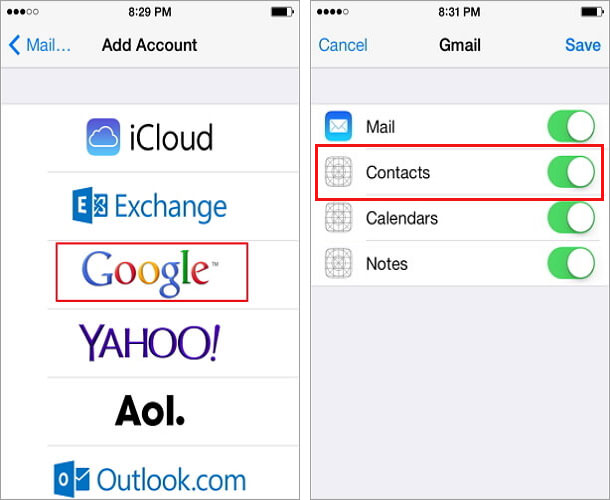
Step 4Now, go to your iPhone Settings > Contacts > Accounts and choose to “Add an Account”. Select “Google” from the list and provide your Gmail credentials to add this account.
Step 5 Later, you can simply visit your Google account and turn on the option of “Contacts” to sync them on your iPhone.
Option 4. Using iTunes to transfer contacts from Samsung Note 8 to iPhone
Alternatively, you can also take the assistance of iTunes to transfer contacts from Android to iPhone. Even though this is a free solution, it can also get a little complicated at times.
If you are using iTunes on Mac, then you can sync your Google Contacts. Firstly, you need to ensure that your contacts are already in sync with your Google account. You can already follow the above-mentioned steps to sync the contacts on your Android device with Google.
Afterward, just connect your iPhone to your system and launch iTunes. Select the target device and visit its “Info” tab. From here, enable the option of “Sync contacts with” and from the dropdown menu, select your Google Account.
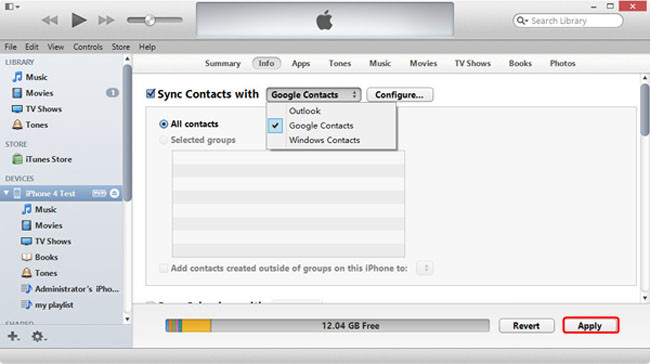
Provide your Google credentials to log-in to your account and click on the “Apply” button to sync your Google contacts with iPhone. Furthermore, you can also sync your Outlook or Windows contacts as well following the same technique.
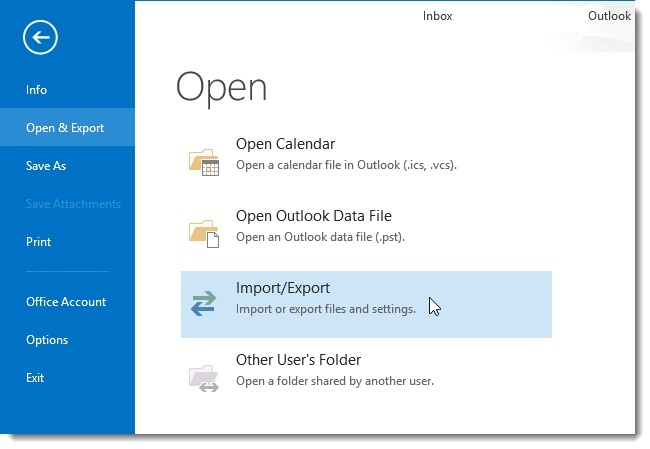
If you are using iTunes on Windows, then you can only sync your Outlook or Windows Contacts. To do this, firstly move your contacts to your PC manually (via SD card or Google). Afterward, you need to sync these contacts with your Outlook account. Later, you can follow the same drill and sync Outlook contacts via iTunes.
Now when you know how to transfer contacts from Android to iPhone, you can easily move from one device to another without losing your data. Go ahead and take the assistance of TunesGo by Wondershare to transfer contacts from Android to iPhone in one click. Additionally, it has plenty of other tools and features that will let you manage your phone without any added effort.
